SCSI Interface Single-Pass Flatbed Scanner FAQ
(Frequently Asked Questions) 1. Selecting the proper scanner when installing the Scanner Solutions CD. 2. Error message: "Make sure: 1. the Scanner is turned on 2. the cables are connected 3. the Scanner is setup correctly and card address does not conflict with other devices." 3. Error message: "Flatbed Scanner Not Ready." 4. A Fatal Exception Error occurs during installation of the TWAIN driver, or Fatal Exception Errors occur during scanning. 5. Error message: "Cannot Find Wing32s.exe" or "Cannot Find Mustek.scr." 6. MWave Error Message On IBM Aptiva.
1. Selecting the proper scanner when installing the Scanner Solutions CD. Cause: The Scanner Solutions CD contains the TWAIN drivers and software for about 10 different Mustek scanners. During installation, the default selection begins near the top of the list of scanners on a model which may or may not be the one you are installing. Solution: Before clicking on NEXT, you must verify that the scanner selected matches the model scanner you are installing. Refer to the scanner model as it appears on the scanner’s box or the front nameplate. You can also refer to the chart below to verify which model scanner you have. Step One: Identify which version of the Scanner Solutions CD you have. There are two common versions of the Scanner Solutions CD, 1.2 and 1.3. To know which version you have, look at the lower left-hand corner of the cardboard jacket that the CD came in. You will see a part number (PN) and then a version number (Ver.). Click here if you have version 1.2 or click here if you have version 1.3. Scanner Solutions Ver. 1.2 | Box . . . | Nameplate . . . | Then choose . . . | | Paragon 1200 SP | MFS-12000SP or 1200 SP | Paragon 600 SP/800 SP/1200 SP (Flatbed) | | Paragon 800 SP | MFS-8000SP or 800 SP | Paragon 600 SP/800 SP/ 1200 SP (Flatbed) | | Paragon 800 II SP | MFS-800S or 800 II SP | Paragon 600 II SP/800 II SP (Flatbed) | | Paragon 600 II SP | MFS-600S or 600 II CD or 600 II SP | Paragon 600 II SP/800 II SP (Flatbed) | | TwainScan II SP | TwainScan II SP or MFS-600S or 600 II CD | TwainScan II SP (Flatbed) | Scanner Solutions Ver. 1.3 | Box . . . | Nameplate . . . | Then choose . . . | | Paragon 1200 SP | MFS-12000SP or 1200 SP | Paragon 600 SP/800 SP/1200 SP (Flatbed) | | Paragon 800 SP | MFS-8000SP or 800 SP | Paragon 600 SP/800 SP/ 1200 SP (Flatbed) | | Paragon 800 II SP | MFS-800S or 800 II SP | Paragon 600 II SP/800 II SP (Flatbed) | | Paragon 600 II SP | MFS-600S or 600 II CD or 600 II SP | Paragon 600 II SP/800 II SP (Flatbed) | | TwainScan II SP | TwainScan II SP or MFS-600S or 600 II CD | TwainScan II SP (Flatbed) |
2. Error message: "Make sure 1. The Scanner is turned on. 2. The cables are connected. 3. The Scanner is set up correctly and card address does not conflict with other devices." Cause: The 123 error message indicates that the TWAIN driver cannot locate the scanner either during a scan, or during the TWAIN installation. Solution: Click on the version of the 123 error message you are getting to see the troubleshooting steps. 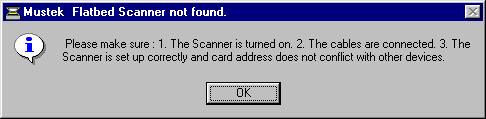
This version of the message usually appears when you try to scan. 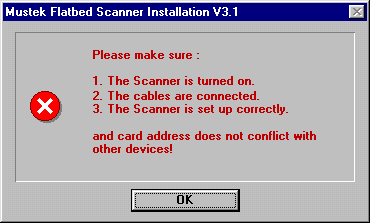
This version of the message usually appears during installation of a TWAIN driver or the Scanner Solutions CD. 123 Error Message -- During Scanning Cause 1: You may not have waited for the carriage to return to the starting position after prescanning. During prescanning, the green LED on the front of the scanner will blink rapidly to indicate that the scanner is busy. Solution 1: Wait for the green LED light on the front of the scanner to stop blinking between prescanning and scanning. Cause 2: You may be having a software conflict. Solution 2: Close and exit any other program that you may have running in the background except for those you are using with your scanner. If you are using Windows 95/98, press the CTRL + ALT + DEL keys simultaneously to see the Close Program window. From this window you can choose the items you wish to close and then click on the End Task button. It may be necessary to reboot the computer in order to clean up the system memory prior to re-attempting the scan. You also may wish to boot Windows 95/98 in Safe Mode to check for software conflicts. Cause 3: Your interface card may have failed. Solution 3: To test the integrity of your interface card you must re-install the TWAIN driver. Shutdown and reboot your computer. After rebooting, re-install the TWAIN Data Source. If your scanner came with a Scanner Solutions CD, re-install the CD. If the Scantest works properly during re-installation, your card is okay. If you get the other 123 message during re-installation, your card may have failed. Go through the troubleshooting steps for the other version of the 123 message listed below. 123 Error Message -- During TWAIN Installation If you get the 123 error message during installation of the TWAIN driver, check the following items: - The SCSI interface card must be well-seated and making good contact. Make sure:
- The card was inserted straight into the slot, not at an angle. Inserting the card at an angle can cause damming to the card or slot, or could leave the card unevenly seated. To properly insert a card, set the computer on a flat surface and position the interface card over the slot. Use both thumbs to push the card straight into the slot. The card should snap into place inside the slot.
- Only the very top of the metal contacts should be visible along the slot edge.
- The metal contacts should also be clean and free of dust, dirt or oil. Before inserting the card, visually check the card for any dirt or dust on the contacts. A gentle rub with a pencil eraser will clean off the contacts quite nicely.
- When the card's bracket is screwed into place, make certain the end of the card doesn't lift out of the slot. Interface card brackets don't always line up perfectly with the mounting holes on the computer's case.
- The Mustek interface card fits only in ISA slots. These are usually made of black plastic and are about 6 inches long. Most computers also have smaller slots called PCI slots. These are usually made of white plastic and are about 4 inches long. A Mustek interface card will not fit into a PCI slot.
- Make sure you are using the original cable that shipped with the scanner. Do not add any extensions to the cable. The Mustek cable has the number 20276 printed on the side of it. You should also check both ends of the cable to make sure none of the pins are broken or bent.
- It is important the I/O port address of the interface card does not conflict with any other device in your computer. The Mustek interface cards do not use an IRQ or DMA, only a I/O port address. Setting the I/O port address depends upon the type of interface card your scanner came with. If you are not sure which type of card you have, click here.
- The very old AX SCSI Cards are not compatible with Mustek's 32-bit TWAIN drivers. If you have an old AX SCSI card, you must purchase a new DTC SCSI card from Mustek's Customer Service Department.
- The AZ SCSI Card, has a three position dip switch that allows you to set an address for the card. Try all eight addresses making sure to turn off the computer before changing the switch. If you are using TWAIN driver version 3.4 or later, you must set the address switches on the card and choose the same address on the list that appears during the driver installation.
- The DTC-3181A and 3181E cards do not have switches. The I/O port address is software controlled and is chosen from a list during the installation of the TWAIN driver.
- If you have a DTC-3181A or 3181E card, you need to be aware of the settings of the jumpers. The 3181A card has one jumper labeled J1, that should be in the OFF position. The 3181E card has two jumpers labeled J1 and J2. On a 3181E, the J1 must be ON while the J2 is OFF. Note: In some cases, the J1 jumper on the 3181A card or the J2 card on the 3181E will need to be changed to the ON position. This should only be done if the card isn't responding under any other circumstances, and if the computer is a high-end Pentium (133 MHz or above). For a visual example of the 3181A and 3181E cards, click here. For a visual example of a jumper and how to set them, click here.
- Make sure you have the latest driver. Go to our Driver Index and download the latest driver. If you download SP35.EXE, you will need to know which SCSI Card you have when you install it. If you have an AZ Card, during installation you should check the Mustek Card option. If you have a DTC 3181A or 3181E, check that option. Do not check the DTC 3151 option because that card only ships in Europe.
- If you are using Windows 95/98 and none of the above things allow installation of the TWAIN driver, boot your computer in Safe Mode and attempt to install the TWAIN Driver. For instructions on booting into Safe Mode, click here.
If none of the above steps solve your problem, Call our Technical Support Department.
3. Error message: "Flatbed Scanner Not Ready." Cause: During a scan, the following error message appears:: 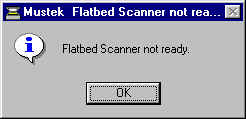 This error message appears because the TWAIN driver chosen during the installation of the Scanner Solutions CD was not the correct TWAIN driver for a flatbed scanner using a SCSI interface card. Look at the front of the scanner. If the nameplate DOES NOT say 600 II EP, then the wrong TWAIN driver was inadvertently installed. Only the TWAIN driver for the 600 II EP produces the above error message. Solution: Re-installing the Scanner Solutions CD and choosing the correct scanner model will correct this problem. Remember, it is NOT necessary to un-install Mustek Scanner Solutions before re-installing the driver. If you are unsure which scanner to choose, check the charts in Problem 1. After re-installing Scanner Solutions, it is necessary to select the proper TWAIN Data Source in iPhoto Plus. Follow these steps: - Start the iPhoto Plus program.
- Click on File and choose Select Source.
- You will see the source dialogue box with at least two sources listed: Mustek F/B Scanner and Mustek F/B Scanner (EPP).
- Click on the source Mustek F/B Scanner and click Select. This will be the proper source for your scanner if it uses a SCSI interface card.
4. A Fatal Exception Error occurs during installation of the TWAIN driver, or Fatal Exception Errors occur during scanning. Cause: Fatal Exception Errors are usually caused by conflicts between programs that run simultaneously. To see a list of programs currently running on your computer, press the CTRL + ALT + DEL keys simultaneously. One or more of the listed programs are preventing the TWAIN driver from installing or running properly. Click here for installation Fatal Exception Errors. Click here for scanning Fatal Exception Errors. Solution 1: If the Fatal Exception Error is occurring during the installation of the TWAIN driver, then it is best to install the TWAIN driver in Windows 95/98 Safe Mode so as to temporarily disable the software that is causing the conflict. Steps to install the TWAIN driver in Safe Mode: - If installing from the Scanner Solutions CD, you must copy the contents of the CD to your hard drive before you boot in Safe Mode because your CD-ROM drive will not operate in Safe Mode. Here are the steps to do this:
- Insert the Scanner Solutions CD in your CD-ROM drive.
- Click the Start button and choose Programs, then start the Windows Explorer.
- Locate the icon for your CD-ROM drive in the LEFT window of the Explorer and double-click it.
- Highlight the Setup95.exe file as well as all of the folders in the RIGHT window of the Explorer. You don’t need to select Tbcl96.31, Tbcladoc, Setup31.exe, Setupmac.exe or Start.wav files. Holding down the CTRL key will allow you to select more than one item.
- Click open the File Menu and select Copy then close the Explorer.
- Using the RIGHT mouse button, click in the lower portion of your Desktop. From the Pop-up Menu, select Paste. The files needed to install Scanner Solutions in Safe Mode will now be copied to your Desktop. You may drag them to the Recycle Bin after installation is complete.
- Reboot your Computer in Safe Mode. Here are the procedures to do this:
- Click Start and select Shutdown.
- Highlight "Restart The Computer?" then click Yes.
- Your computer will shutdown then restart. During the restart, you will see a message on the screen that says "Starting Windows 95 (or 98)..." When you see this message, hold down the F8 key until you see the Windows Startup Menu. For more information on booting into Safe Mode, click here.
- Select "3. Safe Mode" and press the Enter key on your keyboard. Your computer will now begin to boot in Safe Mode. Be patient as it takes longer than a normal boot.
- Now that you are in Safe Mode, you may install the TWAIN driver from floppy disk or from the Scanner Solutions files that were copied to your Desktop. To install from floppy, click Start and select Run then type A:\install and click OK. To install from the Scanner Solutions files on your Desktop, double-click the Setup95.exe icon. Use the Windows 95/98 File Finder to locate the Setup95.exe file if it does not appear on your Desktop. Here are the steps for using the File Finder:
- Click Start and select Find, Files or Folders.
- In the Named Dialog Box, type SETUP95.EXE and click Find Now.
- Once the File Finder locates Setup95.exe, double-click it and the install program will begin to run.
- After you get to the installation screen that asks what type of Interface card you are using, you will be given an opportunity to select an I/O port address for the scanner. The latest drivers prompt you to select an I/O port at the start of the installation, while earlier versions of the TWAIN driver, has you choose on the screen where you perform the Scantest.
- Perform a Scantest to see if the address you have chosen performs satisfactorily. If not, reboot in Safe Mode and try another address until you pass the Scantest.
- After passing the Scantest, click install to finish the software installation. Restart your computer in Normal Mode. If you still have trouble scanning, proceed with the steps outlined in Solution 2 for simplifying your Windows 95/98 startup configuration.
Solution 2: When a Fatal Exception Error occurs during scanning, the best solution is to reduce the number of programs that automatically run when you start Windows 95/98. This procedure is more complex than booting in Safe Mode but will make your system more stable in the end. Steps to simplify startup configuration in Windows 95/98: - Click the Start button and select Run.
- Type SYSEDIT and click OK. This opens the System Configuration Editor which is a simple word processor. Each of your system files will be open in it’s own window.
- Close the Autoexec.bat file without making any changes to it.
- In the Config.sys file, locate a line containing the following:
DEVICE=C:\WINDOWS\HIMEM.SYS (there may be additional text here) - Type the word REM and one space in front of this line as below:
REM DEVICE=C:\WINDOWS\HIMEM.SYS. - Still in the Config.sys file, locate a line containing the following:
DEVICE=C:\WINDOWS\EMM386.EXE (there may be additional text here). - Type the word REM and one space in front of this line as below:
REM DEVICE=C:\WINDOWS\EMM386.EXE. - Click on the File Menu and click Save, then close the Config.sys file.
- In the Win.ini file, locate a line that says:
RUN= - If there is anything after the equal sign, type the word REM and one space as you did above.
- Still in the Win.ini file, locate a line that says:
LOAD= - If there is anything after the equal sign, type the word REM and one space as you did above.
- Click on the File Menu and click Save, then close the Win.ini file.
- Click on the File Menu and click Exit.
- Next we will empty the Startup Program Group.
- Using the RIGHT mouse button, click Start, then click Open and the Start Menu folder will open.
- double-click the Programs folder and it will open.
- Open the Program folder’s File Menu and select New, then Folder.
- Name the new folder OLD STARTUP then press ENTER.
- Double-click the Startup folder and press CTRL + A to highlight all of the items in it.
- Open the Edit Menu and select Copy.
- Open the Old Startup folder that you just created.
- Open it’s File Menu and select Paste. The contents of the Startup folder should now be in the Old Startup folder.
- Double-click the Startup folder and press CTRL + A to highlight all of it’s contents.
- Press the DEL key and confirm deletion of the items in the Startup folder. These programs will no longer automatically load when you boot your computer. If you wish to undo this later, reverse the above process to move them from OLD STARTUP back to Startup.
- Close all folders and restart your computer.
- You may now install the software in accordance with the installation instructions included with your scanner.
NOTE: If you ever need to call your computer manufacturer’s Technical Support line, inform them of the changes you made to the system. Below is a summary of the changes made: - Disabled HIMEM.SYS and EMM386.EXE in the Config.sys file.
- Disabled RUN= and LOAD= lines in the Win.ini file.
- Emptied the Startup Program Group.
5. Error message: "Cannot Find Wing32s.exe" or "Cannot Find Mustek.scr." Cause: Some versions of the Scanner Solutions CD install a 32-bit Windows 95/98 screen saver. If you have Windows 3.1 and do not have a special utility from Microsoft which allows 32-bit screen savers to run in Windows 3.1, you will get one or both of these error messages. Solution: Delete the Mustek Screen Saver. Here are the steps: - Open the Main Program Group and double-click the Control Panel icon.
- Inside the Control Panel, double-click the Desktop icon.
- Under Screen Saver, choose any screen saver besides the Mustek one.
- Save and exit the Desktop and the Control Panel.
- Open the File Manager and delete a file called C:\windows\mustek.scr
If you re-install Scanner Solutions in the future, you will need to repeat these steps.
If you get an error message from the Aptiva's MWave program saying "Unable to play DOS games", ignore it. Chances are that you will not be attempting to play a DOS game while you are scanning, so the error message can just be overlooked. Both the Sound Card and the scanner will still function normally except if you try to play an MS-DOS game during scanning. |