SCSI Single-pass Flatbed Scanner FAQ (Frequently Asked Questions) for Macintosh 1. The Macintosh not recognize the Scanner Solutions CD-ROM and tries to initialize it. 2. There is no SetupMac icon when I look on the Scanner Solutions CD. 3, There is no Mustek scanner listed under Scan/Import in Color It!. 4. TextBridge will not let me select Scanner on the setup screen. 5. Error message: "Scanner not found, please check the SCSI I.D."
1. The Macintosh does not recognize the Scanner Solutions CD-ROM and tries to initialize it. Cause: When the Scanner Solutions CD is inserted into the CD-ROM drive, the Macintosh responds with the message "This disk is unreadable by this Macintosh. Do you want to initialize the disk?" Solutions: Scanner Solutions is a dual-platform CD containing both Macintosh and Windows files. If the Macintosh extension "Foreign File Access" is disabled, the computer will not recognize the PC files and will consider the CD "blank." Foreign File Access must be enabled for the CD to be recognized by the Macintosh. - Click on the Apple menu.
- Select the Control Panel.
- Select the Extensions Manager.
- Locate "Foreign File Access" on the list and click it so that it becomes checkmarked.
- Close the Extensions Manager.
- Click on the Special menu and select Restart.
- After Restarting, the Macintosh will recognize the CD properly.
2. There is no SetupMac icon when I look on the Scanner Solutions CD. Cause: The Scanner Solutions CD icon comes up, and there is a Setup31 and Setup95 icon, but there is no SetupMac icon. Due to a manufacturing error, a number of Scanner Solutions CD-ROMs Version 1.2 were made without the Macintosh installer. The cover of this CD looks like the picture below and has the part number P/N:95-000-20140 VER 1.2 on the lower left corner of the front and back covers and a white serial number sticker starting with the digits S/N:0197 or S/N:0297. 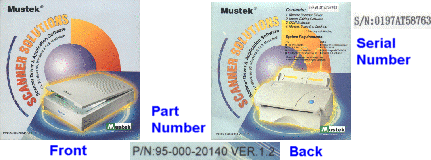
A Scanner Solutions CD with a similar cover picture, but different version or serial number, will not be missing the SetupMac icon. If you find that you have a CD that matches the one above, call our Customer Service Department for a replacement.
3. There is no Mustek scanner listed under Scan/Import in Color It!. Cause: The Mustek scanner is not present under the Scan/Import selection in Color It!. Solution: The plug-in is not properly installed in the Color It! program. The "Mustek F/B Scanner..." plug-in must be installed into the Plug-ins folder in the Color It! Stuff folder. - Double-click on the Color It! folder.
- Locate and double-click on the Color It! Stuff folder.
- Locate and double-click on the Plug-ins folder.
The Plug-ins folder should contain an item called "Mustek F/B Scanner . . . " and a "ColorSync Filter." These plug-ins need to be in the Plug-ins folder in order for Color It! to recognize them. If you do not see these items, check the following: - Make sure the plug-ins aren't in a different folder. From the Finder you can click on File and Find. In the Find window, type in Mustek to see all files with Mustek in the name. Under the File Type category, plug-ins will be listed as Adobe PhotoShop documents.
- Make sure the plug-ins are not in a folder within the Plug-ins folder. If they are, then Color It! will not be able to recognize them. They must be in the Plug-ins folder only.
- Make sure you don't have multiple copies of Color It! in different locations on your hard disk. One copy may have the plug-ins correctly installed, and the other may not.
If you had installed Color It! and the plug-ins from the Scanner Solutions CD, then it will be easy to reinstall them. Simply drag the Color It! folder to the trash (making sure to move any of your own image files out of the folder first), and then run the Scanner Solutions CD again. Color It! will be reinstalled with the plug-ins in the correct place. Click here for help on reinstalling the CD. If you had installed your plug-ins from a floppy disk or from a file downloaded from our web site, then you were prompted to choose a folder to install the plug-ins into. Use the Find command under the File menu to locate them and then move them to the correct place, or reinstall them making sure to select the Color It! Plug-ins folder. Click here for help on installing from floppy.
4. TextBridge will not let me select Scanner on the setup screen. Cause: The TextBridge program setup screen does not have the option for Scanner under the Input section or the program displays a message saying it cannot find the scanner. Solution: TextBridge has not been linked with the scanner ISIS driver. Follow these steps: - Click on the Apple menu in the upper-left corner and select Chooser.
- Locate the Mustek ISIS driver icon. This will usually look like a green Mustek "M" or a scanner and be called Mustek F/B Scanner. Double-click it. Note: Unlike a printer connection, nothing will appear in the information window on the right-hand side of the screen.
- Close the Chooser.
- Click the File menu and click Select Source.
- The TextBridge source window will appear with the name of the ISIS driver as the only choice. Click the OK button.
- The Input box will now have "Scanner" selected.
5. Error message: "Scanner not found, please check the SCSI I.D." Cause: When the Prescan or Scan buttons are clicked, a message is displayed that reads "No Scanner Found, Please Check the SCSI I.D." Solution: There are several reasons this error message can occur. The most common are On & Ready, SCSI I.D. #, Chain Placement, Cabling, Drivers and Termination. On & Ready "Scanner not found" can occur if the scanner is not powered on and ready before the Prescan or Scan buttons are pressed. The scanner should be turned on and initialized before booting up the Macintosh, thus ensuring that the Mac's SCSI bus can identify the scanner as part of the SCSI chain. After being powered on, the scanner will run through an initialization during which the green LED light on the front will blink rapidly while the carriage inside the scanner moves back and forth at the rear of the bed. When the carriage moves into the starting position at the top of the bed and the green LED becomes solid, the scanner is ready. During scanning, the green LED will blink or turn off until the scan or prescan is complete, and then return to solid green. If the Prescan or Scan buttons are clicked before the scanner has a chance to reset itself, the "Scanner not found" message will appear. SCSI I.D. # All items in a SCSI chain are identified by a SCSI I.D. number. This number is usually set by a dial or switch on the unit. On most Macintosh computers, there are certain I.D. settings that cannot be used. They are: 0 -- Is used by the internal hard disk.
3 -- Is used by the internal CD drive.
7 -- Is used by the internal logic board. Two devices sharing the same SCSI I.D. number could cause lock ups or the "Scanner not found" error message. Your Mustek scanner has a SCSI I.D. selector dial located on the rear of the unit near the cable connector. This dial is preset to 6 at the factory. In most cases, this dial will not need to be changed unless you have another device using SCSI I.D.# 6. Follow these steps to change the SCSI ID: - Turn off the scanner and shut down the Macintosh.
- Locate the SCSI ID dial.
- Use a small flat-head screwdriver to turn the dial to the desired setting. (Numbers 8 and 9 on the dial are for testing only and cannot be used.)
- Turn the scanner back on and wait for it to initialize. Boot the Macintosh when the scanner is ready.
Chain Placement It is best to have the scanner as the last item in a SCSI chain, though occasionally other devices between the scanner and the Macintosh will cause the "Scanner not found" message. Try disconnecting other SCSI devices and using the scanner by itself. If the scanner works, you may need to rearrange your SCSI chain with the scanner in front of the conflicting device. Cabling When chaining devices together, try to use the cable supplied with the scanner to link it to your Macintosh or other SCSI devices. This cable has the number 20276 written along the side. If you are getting a "Scanner not found" message, remove any adapters or third party cables and try the scanner with the original cable. If you find that you need to use different cables or adapters, make sure they are rated for SCSI devices, otherwise they may create signal loss. Drivers Older versions of the single-pass ISIS driver and Plug-ins will cause the error message "Scanner not found, please check the SCSI I.D" when Prescan or Scan is clicked. To see which driver version you have: - Double-click on the Hard Disk icon to open it.
- Locate your System Folder and double-click it.
- Within the System Folder, locate and double-click the Extensions Folder.
- In the Extensions folder, locate the "Mustek F/B Scan" and click it once to highlight it.
- Click on the File menu and select "Get Info."
- An information box will appear. Near the end of the list is Version.
If you have version 2.0 or earlier, you will want to upgrade to version 3.1 for best results. Click here to download the Scan Tools update. Termination When running a Mustek scanner as the only device on the SCSI port of a Macintosh, no other termination should be necessary. If you are using the scanner with an older model Macintosh that does not have internal termination (check your user's guide), or if you have the scanner at the end of a multiple-device SCSI chain, you will need a Passive SCSI terminator. Mustek has terminators available to fit each of our scanner models. To obtain a terminator, call our Customer Service Department. |