Plug-n-Scan Page Color FAQ
(Frequently Asked Questions) 1. In Windows 98, the scanner does not respond and never finishes "warming up." Windows 98 ONLY. 2. Selecting the proper scanner when installing the Scanner Solutions CD. 3. Error message: "Make sure: 1. the Scanner is turned on 2. the cables are connected 3. the Scanner is setup correctly and card address does not conflict with other devices." 4. Error messages: "Scanner Not Ready," "Scanner Out of Control," or the scanner never finishes warming up. 5. Printer problems. 6. A Fatal Exception Error occurs during installation of the TWAIN driver, or Fatal Exception Errors occur during scanning. 7. Error message: "Cannot Find Wing32s.exe" or "Cannot Find Mustek.scr." 8. Error message: "Driver Not Found." 9. Error message: "Scan Area Is Invalid."
1. In Windows 98, the scanner does not respond and never finishes "warming up." Windows 98 ONLY. Cause: Because of a subtle change in Windows 98, the Plug-n-Scan Page Color driver cannot always properly connect with the parallel port. Symptoms include: - Scanner keeps displaying message "Warming up" and never initializes.
- The Scan and Prescan buttons are grayed out.
- Clicking on Help and About shows the parallel port setting as "(not connected)" and the firmware as "X.XX".
Solution: Update the scanner driver by downloading the Plug-n-Scan Page Color Windows 98 Update Patch. After downloading the file, run it and try the scanner again. To download the Plug-n-Scan Page Color Windows 98 Update Patch, click here.
2. Selecting the proper scanner when installing the Scanner Solutions CD. Cause: The Scanner Solutions CD contains the TWAIN drivers and software for about 10 different Mustek scanners. During installation, the default selection begins near the top of the list of scanners on a model which may or may not be the one you are installing. Solution: Before clicking on NEXT, you must verify that the scanner selected matches the model scanner you are installing. Refer to the scanner model as it appears on the scanner’s box or the front nameplate. There are two versions of the Page Color sheetfed scanner that are listed on the Scanner Solutions CD. The Plug-n-Scan Page Color connects to the parallel port on your computer while the Paragon Page Color uses an interface card that must be installed in the computer's case. Both model scanners say Page Color on their face, but only the Plug-n-Scan Page Color has two 25-pin connectors on the back along with a coaxial power adapter which looks much like the picture below. 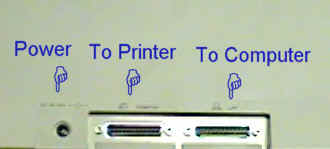
If the back of your Page Color has the three connectors shown above, then choose: Plug-n-Scan Page Color (Sheetfed) from the list of scanners during installation. If your sheetfed scanner came with an interface card and does not have the three connectors shown above, then you have a Paragon Page Color.
3. During installation, the error message: "Make sure 1. The Scanner is turned on. 2. The cables are connected. 3. The Scanner is set up correctly and card address does not conflict with other devices." Cause: The 123 error message indicates that the TWAIN driver cannot locate the scanner's interface card. Since the Plug-n-Scan Page Color uses a parallel port interface and NOT a SCSI card, this message means that the incorrect driver was chosen during installation of the Scanners Solutions CD. Solution: Re-install the Scanner Solutions CD making sure to choose the proper scanner model. Refer to Problem 1 for help on identifying your model.
4. Error messages: "Scanner Not Ready, " "Scanner Out of Control," or the scanner never finishes warming up. Cause:These error messages occur if the driver is unable to communicate with the scanner, or if the scanner is not powered on.
Solution: It is very important that you make sure that the connections are right, that the scanner is getting power, and that the parallel port is set to the proper mode for the scanner. Try the following troubleshooting steps: - The LED light on the scanner above the Stop button will be on if the scanner is connected to power. Make sure the AC adapter is plugged into the connector on the back of the scanner and that it is plugged into a good outlet. The AC converter box located midway on the adapter cord will be warm if it is getting power.
- Disconnect any printers or other parallel port devices from the scanner and connect the scanner directly to the parallel port by itself. This will determine if the error is coming from the scanner, or from a conflict with another device.
- Check the cable connections in the back of the scanner and the computer to make certain they are tight. Verify that you are using the IEEE 1284 cable that came with the scanner and that it is connected from the port labeled "Host" on the rear of the scanner to your computer's parallel port.
- Set the parallel port mode to EPP in the computer's BIOS. This solves many problems with parallel port scanners. For more information on the EPP mode, click here.
- If you have a parallel port Iomega Zip Drive, the drivers for this device may cause the scanner not to function correctly even if the Zip drive has been disconnected. For detailed instructions on configuring the scanner and the Zip drive, click here.
- The driver for the scanner is noted and loads from the Windows system.ini file. It is possible to get multiple entries in the system.ini for the scanner which could conflict with each other. To check for this, do the following:
- Click on Start and select Run.
- Type in sysedit and click OK.
- When the System Configuration Editor appears, close the first three windows, autoexec.bat, config.sys and win.ini, until the system.ini is the open window.
- Carefully scroll through the entries until you see a bracketed section called [386ENH]. Under this section, you will see several items listed like this:
device=*vshare
device=*dynapage
device=*vcd
and so on. Scroll through this list looking for the following items: device=msfcepp.vxd: This is the driver for your scanner, the Plug-n-Scan Page Color. It should have only one entry. If you see multiple entries of this driver, you should position your cursor behind the extra line and delete it with the BACKSPACE key. There should only be one entry for msfcepp.vxd. device=msfcd.vxd: This is the driver for the Paragon Page Color, a different model Mustek sheetfed scanner which was probably installed inadvertently. If your system.ini has this line along with the line mentioned above, then position your cursor behind this entry and remove it with the BACKSPACE key. If your system has this line, but not the one above, then you will need to remove and re-install your Scanner Solutions CD, this time choosing the correct scanner as explained in Problem 1. If you made changes to the system.ini file, then click on File and Save, then File and Exit. Restart your computer and try using the scanner again. If you didn't make changes to the system.ini, then select File and Exit and proceed with the other troubleshooting steps. - If the computer does not have an EPP mode (some old 486s don't), we suggest that you do one of the following:
1. (Easy) Get a scanner like the 1200 III SP which attaches to a 16-bit ISA SCSI card that comes with the scanner.
2. (Difficult -- Only for users familiar with IRQ/DMA Issues) Purchase an enhanced parallel port interface card such as the SIIG Parallel Pro Enhanced Parallel Port.
Note: If you choose to buy a second parallel port and experience difficulty installing it, you must contact the manufacturer of the card if you need help with installation or configuration.
5. Printer problems. Cause: Scanner works fine, but printers plugged into the port on the back of the scanner return error messages that "communication has failed," or that they are "out of paper" or will just not respond at all. The printer works fine, however, when not attached to the back of the scanner. The Mustek Plug-n-Scan Page Color does not support bi-directional print mode on its built in pass-through printer port. Solution: If your printer does not print properly when attached to the scanner's pass-through port, you may be able to disable the bi-directional printing in your printer's driver. Click on the appropriate link below for instructions on configuring your model printer to work with your scanner: Hewlett Packard Printers & Plug-n-Scan Page Color Scanners
Epson Printers & Plug-n-Scan Page Color Scanners
All Other Brands & Plug-n-Scan Page Color Scanners Some users would prefer to install a second printer port rather than disable bi-directional printing on their printer. The following document has tips for installing the popular SIIG Parallel Pro Enhanced Printer Port. SIIG Parallel Pro Installation Tips.
6. A Fatal Exception Error occurs during installation of the TWAIN driver, or Fatal Exception Errors occur during scanning. Cause: Fatal Exception Errors are usually caused by conflicts between programs that run simultaneously. To see a list of programs currently running on your computer, press the CTRL + ALT + DEL keys simultaneously. One or more of the listed programs are preventing the TWAIN driver from installing or running properly. Click here for installation Fatal Exception Errors. Click here for scanning Fatal Exception Errors. Solution 1: If the Fatal Exception Error is occurring during the installation of the TWAIN driver, then it is best to install the TWAIN driver in Windows 95/98 Safe Mode so as to temporarily disable the software that is causing the conflict. Steps to install the TWAIN driver in Safe Mode: - If installing from the Scanner Solutions CD, you must copy the contents of the CD to your hard drive before you boot in Safe Mode because your CD-ROM drive will not operate in Safe Mode. Here are the steps to do this:
- Insert the Scanner Solutions CD in your CD-ROM drive.
- Click the Start button and choose Programs, then start the Windows Explorer.
- Locate the icon for your CD-ROM drive in the LEFT window of the Explorer and double-click it.
- Highlight the Setup95.exe file as well as all of the folders in the RIGHT window of the Explorer. You don’t need to select Tbcl96.31, Tbcladoc, Setup31.exe, Setupmac.exe or Start.wav files. Holding down the CTRL key will allow you to select more than one item.
- Click open the File Menu and select Copy then close the Explorer.
- Using the RIGHT mouse button, click in the lower portion of your Desktop. From the Pop-up Menu, select Paste. The files needed to install Scanner Solutions in Safe Mode will now be copied to your Desktop. You may drag them to the Recycle Bin after installation is complete.
- Reboot your Computer in Safe Mode. Here are the procedures to do this:
- Click Start and select Shutdown.
- Highlight "Restart The Computer?" then click Yes.
- Your computer will shutdown then restart. During the restart, you will see a message on the screen that says "Starting Windows 95 (or 98)..." When you see this message, hold down the F8 key until you see the Windows Startup Menu. For more information on booting into Safe Mode, click here.
- Select "3. Safe Mode" and press the Enter key on your keyboard. Your computer will now begin to boot in Safe Mode. Be patient as it takes longer than a normal boot.
- Now that you are in Safe Mode, you may install the TWAIN driver from floppy disk or from the Scanner Solutions files that were copied to your Desktop. To install from floppy, click Start and select Run then type A:\install and click OK. To install from the Scanner Solutions files on your Desktop, double-click the Setup95.exe icon. Use the Windows 95/98 File Finder to locate the Setup95.exe file if it does not appear on your Desktop. Here are the steps for using the File Finder:
- Click Start and select Find, Files or Folders.
- In the Named Dialog Box, type SETUP95.EXE and click Find Now.
- Once the File Finder locates Setup95.exe, double-click it and the install program will begin to run.
- After the software is installed, restart your computer in Normal Mode. If you still have trouble scanning, proceed with the steps outlined in Solution 2 for simplifying your Windows 95/98 startup configuration.
Solution 2: When a Fatal Exception Error occurs during scanning, the best solution is to reduce the number of programs that automatically run when you start Windows 95/98. This procedure is more complex than booting in Safe Mode but will make your system more stable in the end. Steps to simplify startup configuration in Windows 95/98: - Click the Start button and select Run.
- Type SYSEDIT and click OK. This opens the System Configuration Editor which is a simple word processor. Each of your system files will be open in it’s own window.
- Close the Autoexec.bat file without making any changes to it.
- In the Config.sys file, locate a line containing the following:
DEVICE=C:\WINDOWS\HIMEM.SYS (there may be additional text here) - Type the word REM and one space in front of this line as below:
REM DEVICE=C:\WINDOWS\HIMEM.SYS. - Still in the Config.sys file, locate a line containing the following:
DEVICE=C:\WINDOWS\EMM386.EXE (there may be additional text here). - Type the word REM and one space in front of this line as below:
REM DEVICE=C:\WINDOWS\EMM386.EXE. - Click on the File Menu and click Save, then close the Config.sys file.
- In the Win.ini file, locate a line that says:
RUN= - If there is anything after the equal sign, type the word REM and one space as you did above.
- Still in the Win.ini file, locate a line that says:
LOAD= - If there is anything after the equal sign, type the word REM and one space as you did above.
- Click on the File Menu and click Save, then close the Win.ini file.
- Click on the File Menu and click Exit.
- Next we will empty the Startup Program Group.
- Using the RIGHT mouse button, click Start, then click Open and the Start Menu folder will open.
- Double-click the Programs folder and it will open.
- Open the Program folder’s File Menu and select New, then Folder.
- Name the new folder OLD STARTUP then press ENTER.
- Double-click the Startup folder and press CTRL + A to highlight all of the items in it.
- Open the Edit Menu and select Copy.
- Open the Old Startup folder that you just created.
- Open it’s File Menu and select Paste. The contents of the Startup folder should now be in the Old Startup folder.
- Double-click the Startup folder and press CTRL + A to highlight all of it’s contents.
- Press the DEL key and confirm deletion of the items in the Startup folder. These programs will no longer automatically load when you boot your computer. If you wish to undo this later, reverse the above process to move them from OLD STARTUP back to Startup.
- Close all folders and restart your computer.
- You may now install the software in accordance with the installation instructions included with your scanner.
NOTE: If you ever need to call your computer manufacturer’s Technical Support line, inform them of the changes you made to the system. Below is a summary of the changes made: - Disabled HIMEM.SYS and EMM386.EXE in the Config.sys file.
- Disabled RUN= and LOAD= lines in the Win.ini file.
- Emptied the Startup Program Group.
7. Error message: "Cannot Find Wing32s.exe" or "Cannot Find Mustek.scr." Cause: Some versions of the Scanner Solutions CD install a 32-bit Windows 95/98 screen saver. If you have Windows 3.1 and do not have a special utility from Microsoft which allows 32-bit screen savers to run in Windows 3.1, you will get one or both of these error messages. Solution: Delete the Mustek Screen Saver. Here are the steps: - Open the Main Program Group and double-click the Control Panel icon.
- Inside the Control Panel, double-click the Desktop icon.
- Under Screen Saver, choose any screen saver besides the Mustek one.
- Save and exit the Desktop and the Control Panel.
- Open the File Manager and delete a file called C:\windows\mustek.scr
If you re-install Scanner Solutions in the future, you will need to repeat these steps.
8. Error message: "Driver Not Found." Cause: This message is displayed when you attempt to acquire the TWAIN driver in a scanning application or select source. Solution: The Page Color driver loads in the Windows system.ini file when the computer is booted up, and if the driver had just been installed without re-booting the system, the scanning application would not find an active TWAIN driver. After installation, re-boot the system so the driver may load properly.
9. Error message: "Scan Area Is Invalid." Cause 1: This error message occurs when the cropping frame is larger than the actual document or photo being fed through the scanner. If you set paper size to Letter, and then run a 4" x 6" photo through a sheetfed scanner, you will get this error message. Cause 2: The Page Color scanner driver's default paper size is A4. This is a European paper size which is slightly larger than 8-1/2" x 11". Solution 1: You can just ignore the error message and your document or picture will appear in your host application. You will then see that the scanner scanned an area larger than the original document. Solution 2: If your document is a standard sized page or photo, make sure you choose the paper size correctly from the drop down list. For full sized documents, choose "Letter" instead of "A4" for the paper size. Solution 3: If your document is not standard sized, you should set the paper size to custom then prescan the document. Next, set the cropping box to the edges of your prescanned image. Place your document back in the feed tray and scan it again. If the cropping box was set to the edges of your document or inside of the edges, you will not get the error message. If these steps did not solve the problem, call our Technical Support Department for assistance. |