1200 LS/9636 LS FAQ (Frequently Asked Questions) 1. Does the scanner need a terminator? 2. Problem: In the Direct Scan program, selecting Auto for paper-size does not auto-crop and leaves a black background around the image. 3. Problem: Windows 3.1x - Choosing File then Acquire in a host application gives an error message stating "The winaspi.dll file cannot be found," and the scanner will not operate. 4. Problem: In the TWAIN Dialog box, the features under Enhance do not change or affect the image. 5. Problem: The scanner does nothing after clicking on "acquire," or locks up during prescans and returns the error message "TWAIN error: error opening data source due to unknown causes." 6. Problem: Initiating a scan in a host application gives an error message "Scanner not Ready," or the computer may freeze and the scanner not operate. 7. Error message: "UI caused a general protection fault in module UI.EXE." 8. Problem: The scanner light stays on all the time. 9. Problem: The Direct Scan program does not have the paper size "legal" as an option.
1. Does the scanner need a terminator? Cause: A terminator is not included in the scanner package. Solution: A terminator is only needed if the scanner is the last device in a SCSI chain controlled by a third-party SCSI card. No terminator is needed if the scanner is used with the supplied DTC-3181L card. If a terminator is necessary, one can be obtained from the Customer Service Dept.
2. Problem: In the Direct Scan program, selecting Auto for paper-size does not auto-crop and leaves a black background around the image. Cause: An early version of the driver did not include the auto-crop feature. Solution: Downloading and installing the latest driver will correct this issue. Click here to download the latest driver.
3. Problem: Windows 3.1x - Choosing File then Acquire in a host application gives an error message stating "The winaspi.dll file cannot be found," and the scanner will not operate. Cause: The driver for the DTC-3181L SCSI card that came with the scanner did not include the Windows 3.1x version of the ASPI driver necessary for the scanner to operate with the SCSI card. Solution: Download the Windows 3.1x ASPI driver for the DTC-3181L. Click here to download the file.
4. Problem: In the TWAIN Dialog box, the features under Enhance do not change or affect the image. Cause: An early version of the driver did not allow the Enhancement features to function correctly.. Solution: Download and install the latest driver to correct the Enhancement features. Click here to download the latest driver.
5. Problem: The scanner does nothing after clicking on "acquire," or locks up during prescans and returns the error message "TWAIN error: error opening data source due to unknown causes." Cause: This problem is caused by compatibility issues between the TWAIN driver and certain versions of a file called WINASPI.DLL. The TWAIN driver cannot use updated versions of the WINASPI.DLL file. In some instances, this problem is caused by a conflict between the TWAIN driver and Adaptec Direct CD writer software loading in the Windows 95/98 registry. Solution: The 1.0 version of WINASPI.DLL must be active in the system for the TWAIN driver to work. In many cases, when the WINASPI.DLL has been updated, the original versions are still saved in the system under a different file extension, such as WINASPI.BAK. Follow the steps below to search for different versions of the WINASPI.DLL file and rename them accordingly. NOTE: Users who have Adaptec Direct CD writer software may wish to examine Step Three of the instructions for removing this software from the Windows 95/98 registry. Step One - Using the Find command to locate all versions of WINASPI.DLL. - Configure Windows to display all file types.
- From the Desktop, click on the icon called "My Computer."
- In the "My Computer" window, click once on the C:\ icon to highlight it.
- Click on View and select Options.
- When the Options window appears, click on the View tab.
- Click the radio button in front of the Show All Files option. Put a checkmark in the box labeled "Display the full MS-DOS path in the title bar."
- Click the OK at the bottom of the Options window.
- Close the "My Computer" icon.
- Click on Start and select Find. From the menu choose Files or Folders.
- When the dialog box appears, type "winaspi.*" (without the quotes) in the space called Named.
- Click on the Find Now button.
- The Find File window will now display all the files beginning with "winaspi."
- Use these steps to check the version of each WINASPI file.
- Highlight the first file by clicking on it once.
- Click on the File menu and select Properties.
- In the Properties window, click on the tab called Version.
- Note the version number of the file.
- Repeat these steps until you find the 1.0 version of WINASPI or until you've checked all the files.
- Once the WINASPI file version 1.0 is found, it will need to be renamed WINASPI.DLL so that it can be active in the system. Proceed to Step Two for instructions on renaming the files. If none of the WINASPI files were version 1.0, then you will need to download the file or call our Customer Service Department to request a copy on disk. You will still need to rename the currently active version of WINASPI.DLL before installing version 1.0.
- After finding all the versions of WINASPI, as outlined in Step One, it is now necessary to rename the files to make the WINASPI version 1.0 the active file.
- In the Find File window, click and highlight the current active file called WINASPI.DLL.
- Click on the File menu and select Rename.
- A small window will surround the highlighted file. Click in the window to place a blinking cursor at the end of the file name. Use your BACKSPACE key to remove the DLL from the filename.
- Type in MSK where the DLL used to be and press ENTER. The filename should now read "winaspi.msk" (without the quotes). Make sure that the period is still in place between winaspi and msk.
- Click once to highlight the WINASPI.BAK file that we identified as version 1.0 in Step One. Reminder: If you didn't find a version 1.0 winaspi file in Step One, you will need to download the file or call our Customer Service Department to request it.
- Click on the File menu and select Rename.
- When the small window appears around the filename, click your cursor behind the name and use your BACKSPACE key to remove the BAK from the filename.
- Type in DLL where the BAK used to be and press ENTER. The filename should now read "winaspi.dll" (without the quotes). Make sure that the period is still in place between winaspi and dll.
- Close the Find File window. Click on Start and select Shut Down. Click the radio button in front of the "Restart the computer" option and click Yes.
- After the computer restarts, try scanning again. The scanner should now work. If you encounter further problems, consult the other FAQ categories or call Mustek Technical Support. Users who have the Adaptec Direct CD writer software should proceed to Step Three. NOTE: Only those users who have a CD-ROM writer using the Adaptec Direct CD writer software should proceed to Step Three.
- Before changing the registry, it is necessary to back up the current copy. The registry is very important to Windows 95/98, so these steps should be followed to the letter:
- Click on Start and select Shut Down. Click the radio button in front of the "Restart the computer" option and click Yes.
- After the system restarts, click on Start and select Run.
- On the Run command line, type in regedit and click OK.
- When the Registry Editor displays, click on the Registry menu and select Export Registry File.
- Double-click on My Computer under the Save In window.
- Double-click on the C:\ drive icon.
- On the filename line, type Mustek.
- Under Export Type, click the radio button next to All.
- Click on Save.
- From the registry entries in the left-hand window, double-click HKEY_LOCAL_MACHINE.
- Double-click on SOFTWARE.
- Double-click on Microsoft.
- Double-click on Windows.
- Double-click on CurrentVersion.
- Double-click on Run.
- In the right-hand window, double-click on Adaptec DirectCD.
- This will display an Edit String window. Under Value Data, in front of the drive letter of the path statement, put a semi-colon as in this example: ;C:\Program Files\CD-Writer Plus\DirectCD\DIRECTCD.EXE.
- Click OK.
- Close the Registry Editor window.
- Right mouse click on the Start button.
- From the menu, select Open.
- Double-click on Programs and then double-click on Start Up. Leave this window open.
- Click on Start and select Find. Choose Files or Folders from the menu.
- In the Named box type DIRECTCD.EXE and click Find Now.
- One file should appear in the lower window. Click the file once to highlight it and click on the Edit menu.
- From the Edit menu, select Copy.
- Click on the Start Up window that was left open in step "n," click on the Edit menu and select Paste Shortcut. A shortcut to DirectCD should appear in the Start Up window.
- Close all the open windows. Click on Start and select Shut Down. Click the radio button next to "Restart the computer" and then click Yes.
- After the computer restarts, trying scanning again.
6. Problem: Initiating a scan in a host application gives an error message "Scanner not Ready," or the computer may freeze and the scanner not operate. Cause 1: There is a Wait State jumper labeled "J2" on the interface card. If your computer is faster than 133 MHz and the J2 jumper is not on both gold connectors, it can cause this problem. Cause 2: The interface card may not be seated completely at the bottom of the ISA slot. Cause 3: The connections for the scanner may not be tight, or the power adapter may not be connected to a working power outlet. Solution 1: The proper configuration for faster computers (133 MHz +) is to set the J1 AND J2 jumper pins to "on" so they are covering both gold connections. Follow these instructions: - Close all programs on your computer. Click on "Start" then "Shutdown." Click the radio button next to "Shut down computer?" then click "Yes."
- Turn off your computer.
- Disconnect the scanner cable from the interface card.
- Remove the cover from your computer and uninstall the interface card.
- Locate the J2 jumper pin. The small black connector must be connecting both gold posts sticking up from the card.
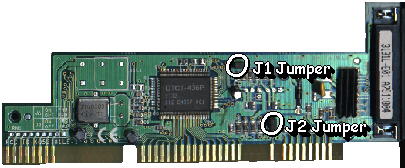
- After connecting the jumper pin, re-install the card, connect the scanner, and start your computer.
- Try using the scanner again.
Solution 2: When inserting the interface card, make sure that you use even pressure on both sides of the card. Do not rock it back and forth to insert it. If the card is fully seated, the gold connectors will appear to be even across the entire length of the top of the slot. Only the very top of the connectors should be visible. A properly installed card will appear in the Device Manager under SCSI Controllers without a yellow exclamation mark next to it. Follow these instructions to access your Device Manager. - Click on the "Start" button and choose "Settings."
- From the Settings flyout window choose "Control Panel."
- In the "Control Panel" window open the icon labeled "System."
- Locate the tab for Device Manager and click on it.
- To find out the status of the card, click on the plus sign (+), click on the DTC3181x card, then click on the button labeled "Properties." Under the heading "Device Status" it should say "This device is working properly" in the dialog box.
Solution 3: See if the light in the scanner turns on. The first time you plug the scanner in, the light should come on. If it doesn't, the scanner is defective or the power outlet is not working. Try another power outlet to make sure. Double check all your cables and make sure they are tight, or try swapping the ends of the cable. Make sure you are using the cable and power adapter that originally came with your scanner.
7. Error message: "UI caused a general protection fault in module UI.EXE." Cause: Setting the resolution too high during the installation of TextBridge usually causes this problem. Solution: This has been linked to the WIN.INI file. The specific line is under the [Slim New UI] section and is: ResIndex=8 The problem can be fixed by changing the line to: ResIndex=1.
Windows 3.1x users follow these steps to change this line:
Windows 95/98 users click here. - From the Program Manager click on "File" and then "Run."
- Type "sysedit" and click "Okay." This will bring up a series of windows in the System Configuration Editor.
- Close the first window, which is AUTOEXEC.BAT.
- Close the next window, CONFIG.SYS. The third window is the WIN.INI. Scroll down to the [Slim New UI] section. (If you have trouble finding it, click on "Search" at the top of the window. Click "Find" in the dialog box and type the word Slim then click the "Next" button. This will take you to the [Slim New UI] section.)
- Go to the line ResIndex=.
- Change the line to ResIndex=1.
- From the File menu, click "Save."
- Close the WIN.INI
- Click on File and choose "Exit."
- Shut down and restart the computer.
Windows 95/98 users follow these steps:
Windows 3.1x users click here. - Click on "Start."
- Click on "Run."
- Type "sysedit" and click "Okay." This will bring up a series of windows in the System Configuration Editor.
- Close the first window, which is AUTOEXEC.BAT.
- Close the next window, CONFIG.SYS. The third window is the WIN.INI. Scroll down to the [Slim New UI] section. (If you have trouble finding it, click on "Search" at the top of the window. Click "Find" in the dialog box and type the word Slim then click the "Next" button. This will take you to the [Slim New UI] section.)
- Go to the line ResIndex=.
- Change the line to ResIndex=1.
- From the File menu, click "Save."
- Close the WIN.INI
- Click on File and choose "Exit."
- Click on "Start" and choose "Shut Down."
- Check the radio button next to "Restart the Computer."
- Click on "Yes."
8. Problem: The scanner light stays on all the time. Cause: The scanner has no on/off switch, and it is meant to stay on all the time. Solution: It will not harm the scanner or the lamp. This scanner uses a cold cathode lamp with a mean time between failure of 30,000 hours. If you would prefer the light turned of unplug the power adapter, or connect it to a switchable power strip. You must make sure the scanner has power before booting your computer, or it will not be recognized by the computer.
9. Problem: The Direct Scan program does not have the paper size "legal" as an option. Cause: Early versions of the driver did not include the legal-size option. Solution: Download and install the latest driver to add legal-size to Direct Scan. Click here to download the latest driver. |