1200 III SP FAQ (Frequently Asked Questions)
1. "Insufficient Memory," READ SCAN DATA() Error, Twunk 16, Twunk 32, IplugTW,Data Source, Image width is inconsistent with the columns of the transfer buffer. This doesn't support compressed image transfer
TWAIN Error [T009],
TWAIN data source does not support this memory transfer. [T018].
Insufficient memory to perform TWAIN operation. [T018]. 2. There is no terminator included with the scanner. 3. Windows 95/98 keeps finding New Hardware every time the computer is started and the scanner appears in the Device Manager with a yellow exclamation mark in front of it. 4. Mustek is not among the list of scanner brands to choose from when installing TextBridge Classic 5. In Windows 3.1x an error occurs stating "The winaspi.dll cannot be found" and the scanner will not operate. 6. Error messages: "IplugTW caused a general protection fault in module 600.DS" or "Twunk_16 has caused a general protection fault in module 600ds."
7. "Floating Point Error -- invalid page area."
8. Scanner does nothing after clicking on "acquire," or locks up during prescans and returns the error message "TWAIN error: error opening data source." 9. "Scanner Not Ready." 10. "Integer divide by Zero" or "C Runtime error." 11. "UI caused a general protection fault in module UI.exe." 12. The scanner light stays on all the time. 13. A Fatal Exception Error 06 occurs when using TextBridge Classic or an image editing program like iPhoto Plus.
1. Problem: 1200 III SP owners with more then 32 MB of RAM get one or more of the following error messages when scanning in resolutions that produce files larger than 4 MB: READ_SCAN_DATA() Error
Twunk_16
Twunk_32
IplugTW
Data Source, Image width is inconsistent with the columns of the transfer buffer. This doesn't support compressed image transfer.
TWAIN Error [T009], TWAIN data source does not support this memory transfer. [T018]. Insufficient memory to perform TWAIN operation. [T018]. Cause1: The TWAIN driver shipped with the 1200 III SP contains a bug that will not allow the TWAIN driver to allocate memory correctly.
Cause 2: The UI.exe (User Interface) for the scanner contains a minor bug that can cause inexplicable "Insufficient Memory" errors. In certain instances the resolution box will display a lower resolution than the TWAIN driver is actually set to. Solution1: Download TWAIN Driver Patch for the 1200 III SP. Solution 2: A quick way to determine if this is the problem is to compare the resolution setting to the Image Size displayed at the bottom of the TWAIN window. If the resolution is set to 100-dpi, but the image size is greater then 3 MB (3,000+ kb), this is definitely a problem. To correct this, just select any resolution other than 100-dpi, then move back to 100-dpi. This will cause the updated resolution to be sent to the TWAIN driver. The Image Size reading should also adjust downward to reflect the correct size.
2. Problem: There is no terminator included with the scanner. Cause: According to the Installation Road Map for the 1200 III SP, there is a note in section 8 of the PC installation portion that states "Make sure that the scanner is terminated by connecting a terminator to the remaining SCSI port." There is no terminator included with the scanner.
Solution: This is an error in the installation instructions. A terminator is only needed if the scanner is going to be the last device in a SCSI chain controlled by a third-party SCSI card. No terminator is needed if the scanner is used with the supplied DTC-3181L card. Our Customer Service Department has terminators available.
3. Problem: The computer keeps finding new hardware every time Windows 95/98 is started and the scanner appears in the Device Manager with a yellow exclamation mark in front of it. Cause: Windows' automatic hardware detection finds the scanner and adds it to the Device Manager, but it does not have the necessary information to list the scanner under its own category, and therefore places it under Other Devices. Because this entry information is incomplete, an exclamation mark appears in front of the entry and Windows will re-detect the device on every start up. Solution: While it is possible to skip or ignore Windows' reminders about the scanner on every boot-up, it is recommended to download the file below that will create a proper Device Manager entry for your scanner and end the tedious reminder messages. Click here to download the SCSI Scanner Device Manager entry file. After downloading this file, click on its name to run the self-extracting program. IMPORTANT: The file includes a Read Me document providing instructions for proper installation. Make sure to read and print out this Read Me file.
4. Mustek is not among the scanners listed when installing TextBridge Classic. Cause: The list of scanner names you are seeing is a list of ISIS drivers. ISIS is a type of scanner driver used mainly for OCR programs. Your Mustek scanner does not use the ISIS driver type, but instead uses the TWAIN driver interface for image and OCR scanning, and therefore does not appear on the list. Solution: Follow these steps to move out of the ISIS selection screen and back to the TWAIN selection screen: - Click on the "Cancel" button.
- A gray dialog box will appear listing several choices. Click on "Setup."
- You will see a familiar dialog box and be prompted to "Choose the Type of Scanner Driver You Wish To Install."
- Choose TWAIN from the list of driver types.
- A box will display showing your TWAIN sources. Choose Paragon 1200 III SP from the list and click on "Select."
- TextBridge will now prompt you to test the scanner interface. This is unnecessary. Click on "Exit" to finish the installation.
- When the "Electronic Registration" window appears, you can choose to fill in the information, or click "Cancel" to finish installation.
5. Problem: Windows 3.1x - Choosing File then Acquire in a host application gives an error message stating "The winaspi.dll file cannot be found," and the scanner will not operate.
6. Problem 1: When a scan is initiated an error occurs stating "IplugTW caused a General Protection fault in module 600ds." This problem occurs in the iPhoto Plus program.
Problem 2: When a scan is initiated an error occurs stating "Twunk_16 has caused a General Protection fault in module 600ds." This error occurs in iPhoto 4.0, Picture Publisher or TextBridge. Cause: These errors are both caused by a software conflict. In most cases this problem has been linked to a driver loaded by the SYSTEM.INI file. In some cases, the driver conflicts with certain STB Vision video cards. Solution 1: The first thing that needs to be done is to check the SYSTEM.INI file and correct it if necessary. - In Windows 3.1x, Click on "File" then click on "Run." In Windows 95/98, click on "Start" and select "Run."
- Type "sysedit" and click "Okay." This will bring up a series of windows in the System Configuration Editor.
- Close the first three windows: AUTOEXEC.BAT, CONFIG.SYS, and WIN.INI.
- The fourth window is the SYSTEM.INI. Scroll to the [BOOT] section. (Note: Do not go to the [BOOT DESCRIPTION] section.) Look for the line that says "system.drv=." Be sure that the line says "system.drv=system.drv." If the line says "system.drv=atmsys.drv," change it to read "system.drv=system.drv."
- Close the SYSTEM.INI. When it prompts to save the changes click "Yes." Click on File and choose Exit.
- Shut down and restart the computer.
- After the computer restarts, try another scan.
Solution 2: Another possible solution is to change the video driver if you have an STB Vision video card. IMPORTANT NOTE: Do not attempt this step unless you have the video driver disks that came with your video card. You will not be able to undo this process without those disks. - Click on the "Start" button.
- Click on "Settings."
- Click on "Control Panel."
- Click on "Display."
- Click on the "Settings" tab.
- Click on the "Advanced Settings" button or "Change Settings" button depending on your version of Windows 95/98.
- Click on the "Adapter" tab. This will bring up the adapter properties of the computer. If the adapter reads STB Powergraph or Powergraph 64, with STB Vision 95, the STB Vision 95 must be disabled.
- Click on the "Change" button.
- Put a dot next to "Show All Devices."
- Scroll Down the Manufacturer side to OEM STB.
- This will bring up models available for the manufacturer. Click on the STB Powergraph or STB Powergraph 64, depending on the model that was displayed above, WITHOUT STB VISION.
- Click on "OK."
- Click on "Close."
- Click on "Close" again.
- Windows will ask you to restart the computer. Click on "Yes."
- When the computer has restarted, try operating the scanner again.
7. Problem: Initiating a scan causes the error message: "Floating Point Error -- invalid page area." Cause: This error occurs if the scanner sends an all black image to the computer. If the page size is set to custom (Or Auto in Direct Scan), the scanner driver will attempt to automatically set the cropping frame around your picture or document after a prescan. If the image is all black, a floating point error occurs. Solution 1: Make sure you have something in the scanner to scan. If the glass has nothing on it, there will be no image for the crop frame to find except the black lid. This will cause a floating point error. If you did not have anything in the scanner, place something on the glass and try again. Solution 2: Check your settings. A black scan could be produced by having certain settings chosen in the driver. - Make sure that the Scan Mode is set to Color or Gray for color photographs. Scanning a color picture in Line Art mode could produce a black scan.
- It is possible that you may have made changes in the brightness or contrast settings that will render the image all black. To correct this, click the "Enhancements" tab on the scanner driver and then click the "Reset" button at the bottom of the driver window.
Solution 3: If you had a document or photo on the glass, you've checked your settings and a floating point error has reoccurred, you may have a defective scanner. To test for this, do the following: - Set the page size to "Letter" in the driver window. This disables the auto-crop feature that may be producing the error.
- Prescan a document or photo. If the prescan image is all black, you may have a defective scanner.
- Check all the connections for the scanner, making sure they are all tight. The power adapter needs to be plugged into a power outlet that works. Make sure the data cable is plugged into the port on the rear of the scanner labeled "Computer."
- Check to see if the scanner light is on during a prescan. If the light carriage in the scanner travels down the bed, and the light is not on, you have a defective unit. Test the scanner on another computer to make sure.
8. Problem: The scanner does nothing after clicking on "acquire," or locks up during prescans and returns the error message "TWAIN error: error opening data source due to unknown causes." Cause: This problem is caused by compatibility issues between the TWAIN driver and certain versions of a file called WINASPI.DLL. The TWAIN driver versions found on the TWAIN update floppy version 1.0 and the 1200 III SP CD with the part number 95-000-20811 Rev. 1.0 cannot use updated versions of the WINASPI.DLL file. In some instances, this problem is caused by a conflict between the TWAIN driver and Adaptec Direct CD writer software loading in the Windows 95/98 registry. Solution: The 1.0 version of WINASPI.DLL must be active in the system for the TWAIN driver to work. In many cases, when the WINASPI.DLL has been updated, the original versions are still saved in the system under a different file extension, such as WINASPI.BAK. Follow the steps below to search for different versions of the WINASPI.DLL file and rename them accordingly. NOTE: Users who have Adaptec Direct CD writer software may wish to examine Step Three of the instructions for removing this software from the Windows 95/98 registry. Step One - Using the Find command to locate all versions of WINASPI.DLL. - Configure Windows to display all file types.
- From the Desktop, click on the icon called "My Computer."
- In the "My Computer" window, click once on the C:\ icon to highlight it.
- Click on View and select Options.
- When the Options window appears, click on the View tab.
- Click the radio button in front of the Show All Files option. Put a checkmark in the box labeled "Display the full MS-DOS path in the title bar."
- Click the OK at the bottom of the Options window.
- Close the "My Computer" icon.
- Click on Start and select Find. From the menu choose Files or Folders.
- When the dialog box appears, type "winaspi.*" (without the quotes) in the space called Named.
- Click on the Find Now button.
- The Find File window will now display all the files beginning with "winaspi."
- Use these steps to check the version of each WINASPI file.
- Highlight the first file by clicking on it once.
- Click on the File menu and select Properties.
- In the Properties window, click on the tab called Version.
- Note the version number of the file.
- Repeat these steps until you find the 1.0 version of WINASPI or until you've checked all the files.
- Once the WINASPI file version 1.0 is found, it will need to be renamed WINASPI.DLL so that it can be active in the system. Proceed to Step Two for instructions on renaming the files. If none of the WINASPI files were version 1.0, then you will need to download the file or call our Customer Service Department to request a copy on disk. You will still need to rename the currently active version of WINASPI.DLL before installing version 1.0.
- After finding all the versions of WINASPI, as outlined in Step One, it is now necessary to rename the files to make the WINASPI version 1.0 the active file.
- In the Find File window, click and highlight the current active file called WINASPI.DLL.
- Click on the File menu and select Rename.
- A small window will surround the highlighted file. Click in the window to place a blinking cursor at the end of the file name. Use your BACKSPACE key to remove the DLL from the filename.
- Type in MSK where the DLL used to be and press ENTER. The filename should now read "winaspi.msk" (without the quotes). Make sure that the period is still in place between winaspi and msk.
- Click once to highlight the WINASPI.BAK file that we identified as version 1.0 in Step One. Reminder: If you didn't find a version 1.0 winaspi file in Step One, you will need to download the file or call our Customer Service Department to request it.
- Click on the File menu and select Rename.
- When the small window appears around the filename, click your cursor behind the name and use your BACKSPACE key to remove the BAK from the filename.
- Type in DLL where the BAK used to be and press ENTER. The filename should now read "winaspi.dll" (without the quotes). Make sure that the period is still in place between winaspi and dll.
- Close the Find File window. Click on Start and select Shut Down. Click the radio button in front of the "Restart the computer" option and click Yes.
- After the computer restarts, try scanning again. The scanner should now work. If you encounter further problems, consult the other FAQ categories or call Mustek Technical Support. Users who have the Adaptec Direct CD writer software should proceed to Step Three. NOTE: Only those users who have a CD-ROM writer using the Adaptec Direct CD writer software should proceed to Step Three.
- Before changing the registry, it is necessary to back up the current copy. The registry is very important to Windows 95/98, so these steps should be followed to the letter:
- Click on Start and select Shut Down. Click the radio button in front of the "Restart the computer" option and click Yes.
- After the system restarts, click on Start and select Run.
- On the Run command line, type in regedit and click OK.
- When the Registry Editor displays, click on the Registry menu and select Export Registry File.
- Double-click on My Computer under the Save In window.
- Double-click on the C:\ drive icon.
- On the filename line, type Mustek.
- Under Export Type, click the radio button next to All.
- Click on Save.
- From the registry entries in the left-hand window, double-click HKEY_LOCAL_MACHINE.
- Double-click on SOFTWARE.
- Double-click on Microsoft.
- Double-click on Windows.
- Double-click on CurrentVersion.
- Double-click on Run.
- In the right-hand window, double-click on Adaptec DirectCD.
- This will display an Edit String window. Under Value Data, in front of the drive letter of the path statement, put a semi-colon as in this example: ;C:\Program Files\CD-Writer Plus\DirectCD\DIRECTCD.EXE.
- Click OK.
- Close the Registry Editor window.
- Right mouse click on the Start button.
- From the menu, select Open.
- Double-click on Programs and then double-click on Start Up. Leave this window open.
- Click on Start and select Find. Choose Files or Folders from the menu.
- In the Named box type DIRECTCD.EXE and click Find Now.
- One file should appear in the lower window. Click the file once to highlight it and click on the Edit menu.
- From the Edit menu, select Copy.
- Click on the Start Up window that was left open in step "n," click on the Edit menu and select Paste Shortcut. A shortcut to DirectCD should appear in the Start Up window.
- Close all the open windows. Click on Start and select Shut Down. Click the radio button next to "Restart the computer" and then click Yes.
- After the computer restarts, trying scanning again.
9. Problem: Initiating a scan in a host application gives an error message "Scanner not Ready," or the computer may freeze and the scanner not operate. Cause 1: There is a Wait State jumper labeled "J2" on the interface card. If your computer is faster than 133 MHz and the J2 jumper is not on both gold connectors, it can cause this problem. Cause 2: The interface card may not be seated completely at the bottom of the ISA slot. Cause 3: The connections for the scanner may not be tight, or the power adapter may not be connected to a working power outlet. Solution 1: The proper configuration for faster computers (133 MHz +) is to set the J1 AND J2 jumper pins to "on" so they are covering both gold connections. Follow these instructions: - Close all programs on your computer. Click on "Start" then "Shutdown." Click the radio button next to "Shut down computer?" then click "Yes."
- Turn off your computer.
- Disconnect the scanner cable from the interface card.
- Remove the cover from your computer and uninstall the interface card.
- Locate the J2 jumper pin. The small black connector must be connecting both gold posts sticking up from the card.
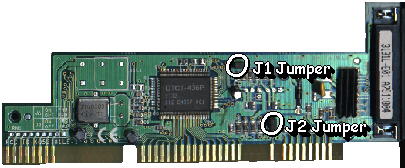 - After connecting the jumper pin, re-install the card, connect the scanner, and start your computer.
- Try using the scanner again.
Solution 2: When inserting the interface card, make sure that you use even pressure on both sides of the card. Do not rock it back and forth to insert it. If the card is fully seated, the gold connectors will appear to be even across the entire length of the top of the slot. Only the very top of the connectors should be visible.
A properly installed card will appear in the Device Manager under SCSI Controllers without a yellow exclamation mark next to it. Follow these instructions to access your Device Manager. - Click on the "Start" button and choose "Settings."
- From the Settings flyout window choose "Control Panel."
- In the "Control Panel" window open the icon labeled "System."
- Locate the tab for Device Manager and click on it.
To find out the status of the card, click on the plus sign (+), click on the DTC3181x card, then click on the button labeled "Properties." Under the heading "Device Status" it should say "This device is working properly" in the dialog box. Solution 3: See if the light in the scanner turns on. The first time you plug the scanner in, the light should come on. If it doesn't, the scanner is defective or the power outlet is not working. Try another power outlet to make sure. Double check all your cables and make sure they are tight, or try swapping the ends of the cable. Make sure you are using the cable and power adapter that originally came with your scanner.
10. Problem: When trying to operate the scanner using TextBridge, you get an error stating "Integer Divide by Zero" or "C runtime error." (This can also happen when using Direct Scan or any other image editing software.) Cause: This error usually occurs if the Descreen option is checked during a high resolution scan and is most likely to occur when trying to scan in the Line Art mode. (Descreen automatically removes moir� patterns from the image. Moir� patterns occur when scanning images that were printed with the four-color process method or other print methods, which use halftone screens. This is common with images scanned out of books or magazines.) Solution: To solve this problem, follow these steps. Window 95 Users - Open the iPhoto Plus program version 1.2. (You can find this program by clicking on your "Start" button, going to the Programs menu, selecting the Mustek 1200 III SP group, and choosing the iPhoto Plus v.1.2 icon.)
- Click on the File menu in the upper left corner, and choose Acquire from the pull down menu.
- This should bring up the TWAIN dialog box. If you get a UI.EXE error message, follow the steps in Problem 11, then return here and continue.
- In the lower left-hand corner of the TWAIN dialog box you will see the Descreen button. Click on the check mark in the radio button to toggle off Descreen.
- Start the iPhoto Plus program.
- Click on the File menu in the upper left of the program and choose Acquire.
- This should bring up the TWAIN dialog box. If you get a UI.EXE error message, follow the steps in Problem 11, then return here and continue.
- In the lower left-hand corner of the TWAIN dialog box you will see the Descreen button. Click on the check mark in the radio button to toggle off Descreen.
11. Problem: After clicking acquire, you get an illegal operation or GPF message stating "UI caused a general protection fault in module UI.EXE." Cause: Setting the resolution too high during the installation of TextBridge usually causes this problem. Solution: This has been linked to the WIN.INI file. The specific line is under the [Slim New UI] section and is: ResIndex=8 The problem can be fixed by changing the line to: ResIndex=1. Windows 3.1x users follow these steps to change this line:
Windows 95/98 users click here. - From the Program Manager click on "File" and then "Run."
- Type "sysedit" and click "Okay." This will bring up a series of windows in the System Configuration Editor.
- Close the first window, which is AUTOEXEC.BAT.
- Close the next window, CONFIG.SYS. The third window is the WIN.INI. Scroll down to the [Slim New UI] section. (If you have trouble finding it, click on "Search" at the top of the window. Click "Find" in the dialog box and type the word Slim then click the "Next" button. This will take you to the [Slim New UI] section.)
- Go to the line ResIndex=.
- Change the line to ResIndex=1.
- From the File menu, click "Save."
- Close the WIN.INI
- Click on File and choose "Exit."
- Shut down and restart the computer.
- Click on "Start."
- Click on "Run."
- Type "sysedit" and click "Okay." This will bring up a series of windows in the System Configuration Editor.
- Close the first window, which is AUTOEXEC.BAT.
- Close the next window, CONFIG.SYS. The third window is the WIN.INI. Scroll down to the [Slim New UI] section. (If you have trouble finding it, click on "Search" at the top of the window. Click "Find" in the dialog box and type the word Slim then click the "Next" button. This will take you to the [Slim New UI] section.)
- Go to the line ResIndex=.
- Change the line to ResIndex=1.
- From the File menu, click "Save."
- Close the WIN.INI
- Click on File and choose "Exit."
- Click on "Start" and choose "Shut Down."
- Check the radio button next to "Restart the Computer."
- Click on "Yes."
12. Problem: The scanner light stays on all the time. Cause: The scanner has no on/off switch, and it is meant to stay on all the time. Solution: It will not harm the scanner or the lamp. This scanner uses a cold cathode lamp with a mean time between failure of 30,000 hours. If the light staying on annoys you, unplug the power adapter, or connect it to a switchable power strip. You must make sure the scanner has power before booting your computer, or it will not be recognized by the computer.
13. A Fatal Exception Error 06 occurs when using TextBridge Classic or an image editing program like iPhoto Plus. Cause: Fatal Exception Errors are usually caused by a software conflict. In the case of TextBridge Classic or an image editing program like iPhoto Plus, it is possible to get a Fatal Exception Error if the TWAIN driver wasn't correctly identified during setup of TextBridge Classic. Solution: Correctly choose the TWAIN driver in TextBridge Classic. Use the steps below: - Start the TextBridge program by clicking on its under the TextBridge Classic program group.
- In the TextBridge program, click on File and Select "Setup Scanner Source."
- You will see a dialog box and be prompted to "Choose the Type of Scanner Driver You Wish To Install."
- Choose TWAIN from the list of driver types.
- A box will display showing your TWAIN sources. Choose Paragon 1200 III SP from the list and click on "Select."
- TextBridge will now prompt you to test the scanner interface. This is unnecessary. Click on "Exit" to return to the program.
- You may now scan in TextBridge without a Fatal Exception Error.
|