Picture Publisher Tutorial Selecting The TWAIN Source Acquiring The Scanner Setting Monitor Gamma
Selecting The TWAIN Data Source (Driver) - Start Picture Publisher.
- Open the File Menu and place your mouse over the Setup command. From the flyout Submenu, choose Scanner.
- The Setup Scanner dialog box shows which TWAIN Data Source is currently selected. To change it, click the Select Source button. From the Source dialog box, highlight Mustek F/B Scanner (EPP-II) which is the TWAIN Data Source for the 600 III EP. Once it is highlighted, click select to return to the previous screen then click OK.
Acquiring The Scanner - Start Picture Publisher.
- Open the File Menu and click on the Acquire command.
- The TWAIN driver should appear.
- Set your Scan Mode and Resolution, then click Prescan.
- Set your Crop Frame, then click Scan.
- When scanning is complete, click the Close button to return to Picture Publisher.
Setting Monitor Gamma - After scanning a picture, you may need to adjust the Monitor Gamma Setting (This can only be done when an image is open).
- Open the File Menu and place your mouse over the Setup command. From the flyout Submenu, choose Monitor.
- On the Monitor Gamma Tab shown below, uncheck Disable Monitor Gamma.
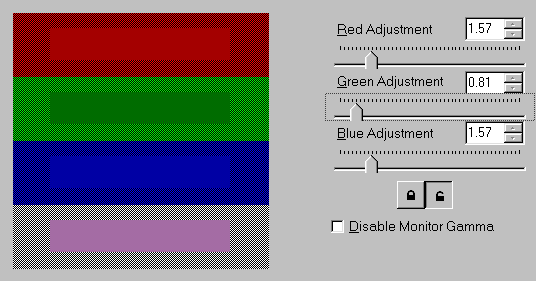
- Slide the Gamma Setting bars for each color until the center of each color band matches the outside portion as closely as possible. The Red and Blue bands shown above match but the green band still needs to be adjusted. Once all three color bands are correct, the center of the gray band should match fairly close also. In the picture above, the gray band appears pink because the green setting needs adjustment.
- Once the settings are right, click OK.
- The Monitor Gamma will now be adjusted and your scanned image will appear lighter or darker accordingly.
|

