| |   | | | Scan Dialog Box/Direct Scan Tutorial Part 1: When to Use the Scan Dialog box Part 2: Accessing the Scan Dialog box Part 3: Components of the Scan Dialog box Part 4: Using the Scan Dialog box
| E-mail (NOTE: To use the e-mail function, the system must be logged on-line to an Internet service provider or on-line service. The e-mail function is not compatible with all services. Consult the tutorial Attaching Pictures to E-mail for help on other ways to e-mail images.) Clicking on the E-mail icon brings up the following options: 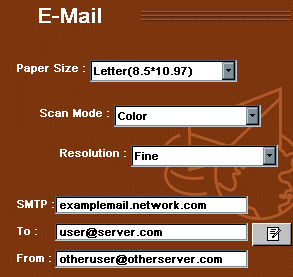
- Select the Paper Size from the pull-down menu. The choices include A4, Letter, and, depending on the scanner model, Legal or A3. There is also an option called Auto. This will make the scanner do a prescan first and then crop to the edge of the image so that only it is scanned.
- Choose the Scan Mode from the pull-down menu. The image can be in Gray, Color or Text (Line Art) mode.
- Choose a Resolution. The menu gives the options for Normal, Fine or Superfine. Normal is generally the best choice for the majority of images, especially when sending e-mail.
- Enter the SMTP. SMTP stands for Simple Mail Transfer Protocol, which is the protocol used by e-mail servers for outgoing e-mail. It will most likely be necessary to contact the Internet service provider or on-line service to find out what the correct SMTP is for the e-mail service being used.
- Enter the e-mail address of the recipient in the To: line.
- Enter the e-mail address of the sender in the From: line.
- Click the E-mail Setting icon to the right of the To: line.
 The E-mail Setting window appears. The E-mail Setting window appears.
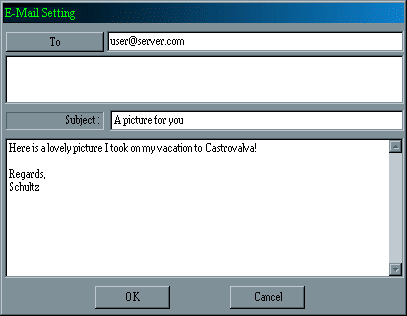
Type the e-mail address of the recipient, just as we did on the original e-mail options screen. Put a subject header in the Subject line and a message in the open space below, much like conventional e-mail. Click the OK button when everything is complete. - Once everything is filled in on the e-mail options screen, click on the Scan Command icon on the right-hand side. The Scan Dialog box will disappear and a small progress indicator will appear. After the scan has completed, the image will be sent along with the e-mail message.
| | To learn how to use a function, click on its icon. | | Scan | Copy | Fax | E-mail | OCR | | 
| 
| 
| 
| 
| | | | | |