Help With The Mustek Scanning Desktop
Mustek Scanning Desktop ForWindows 95The Mustek Scanning Desktop was created to give users a quick way toFAX or Copy documents. These functions can be performed from iPhoto Plusor Picture Publisher; however, there are less steps involved when donefrom the Mustek Scanning Desktop.  Clicking this iconwill allow you to scan an image into iPhoto Plus without having to startiPhoto Plus first. When you click the icon, you will be given a Quick Settingscreen where you can set certain parameters for the scan such as Scan Mode,Resolution and Paper Size. If you click the more Control button, the Twaindialog box will open. The Twain dialog box allows you to do two thingsthe quick setting screen does not allow. First it lets you Prescan andsecond, it lets you set the Crop Frame to a custom paper size. Clicking this iconwill allow you to scan an image into iPhoto Plus without having to startiPhoto Plus first. When you click the icon, you will be given a Quick Settingscreen where you can set certain parameters for the scan such as Scan Mode,Resolution and Paper Size. If you click the more Control button, the Twaindialog box will open. The Twain dialog box allows you to do two thingsthe quick setting screen does not allow. First it lets you Prescan andsecond, it lets you set the Crop Frame to a custom paper size.
 Clicking this iconwill scan a text document using TextBridge Classic OCR. The finished documentwill automatically be opened in the Windows 95 Wordpad. The Quick Settingsscreen allows you to choose Paper Size and 300 dpi or 400 dpi. You shoulduse 300 dpi for most documents because the OCR engine is optimized for300 dpi scans. Use 400 dpi only if the original text is a very small font. Clicking this iconwill scan a text document using TextBridge Classic OCR. The finished documentwill automatically be opened in the Windows 95 Wordpad. The Quick Settingsscreen allows you to choose Paper Size and 300 dpi or 400 dpi. You shoulduse 300 dpi for most documents because the OCR engine is optimized for300 dpi scans. Use 400 dpi only if the original text is a very small font.
 Clicking this iconallows you to photocopy a document from the scanner to the printer. Thedocument will not be saved, merely scanned and printed. The resolutionis rather low so if you need a high quality copy, you should scan the pagewith iPhoto Plus or Picture Publisher at the optimum resolution for yourprinter. See the article on Understanding Resolutionand Color Depth Issues to determine what the best resolution toscan for your printer is if using iPhoto Plus or Picture Publisher. Clicking this iconallows you to photocopy a document from the scanner to the printer. Thedocument will not be saved, merely scanned and printed. The resolutionis rather low so if you need a high quality copy, you should scan the pagewith iPhoto Plus or Picture Publisher at the optimum resolution for yourprinter. See the article on Understanding Resolutionand Color Depth Issues to determine what the best resolution toscan for your printer is if using iPhoto Plus or Picture Publisher.
 Clicking this iconallows you to scan a document and FAX it over your modem. You have tworesolution choices, fine and normal. Normal is 100 dpi and fine is 200dpi which are the standards for FAX machines. Fine Resolution is recommended.The Quick Settings screen has a button which allows you to choose yourFAX software. If your FAX driver is not already listed, you will need tochoose it. Click here to see how to FAX morethan one page. Clicking this iconallows you to scan a document and FAX it over your modem. You have tworesolution choices, fine and normal. Normal is 100 dpi and fine is 200dpi which are the standards for FAX machines. Fine Resolution is recommended.The Quick Settings screen has a button which allows you to choose yourFAX software. If your FAX driver is not already listed, you will need tochoose it. Click here to see how to FAX morethan one page.
 Clicking this iconallows you to scan an image into the InBox with iPhoto Plus. The imagewill be saved in the *.jpg format. From the inbox, you can send the imageto the Printer, FAX modem or e-mail. Clicking this iconallows you to scan an image into the InBox with iPhoto Plus. The imagewill be saved in the *.jpg format. From the inbox, you can send the imageto the Printer, FAX modem or e-mail.
 Clicking this iconallows you to scan text into the InBox with TextBridge Classic OCR. Thedocument will be saved in the *.txt format. From the inbox, you can sendthe image to the Printer or FAX modem. Clicking this iconallows you to scan text into the InBox with TextBridge Classic OCR. Thedocument will be saved in the *.txt format. From the inbox, you can sendthe image to the Printer or FAX modem.
 Clicking this iconallows you to view the contents of the InBox. A picture of the InBox isshown below. Clicking this iconallows you to view the contents of the InBox. A picture of the InBox isshown below.
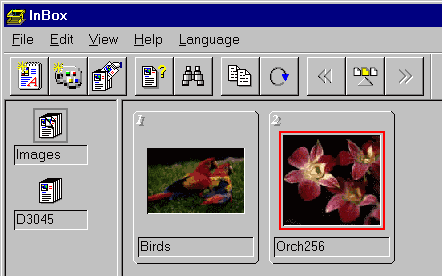
The icons on the left side represent Folders. The one with the GrayBox around it is the active folder. You can rename images or folders bytyping over their name or you can add new folders from the file menu. Youcan move images from one folder to the next by dragging them from the rightwindow to any folder in the left window. The image with the Red Box aroundit is the currently selected file. You can select more than one file byholding down the CTRL key while clicking the files. Any document inthe InBox can be sent to the Printer, FAX or Mail from the Send To commandon the file menu. They can also be dragged to the appropriate icon on theMustek Scanning Desktop. FAXing more thanone page: To FAX multiple pages, do not scan them with the icon.You should use the icon toscan your pages into the InBox. When the Quick Settings screen comes up,set the Scan Mode to Lineart, the Resolution to 200 dpi and the paper sizeto Letter. Scan each page into the InBox in the order that you want toFAX them. Once all pages have been scanned to the InBox, open the InBoxand select all of the pages you wish to FAX in the order you want to sendthem (Selected pages will have a red box around them). Hold down the CTRL keyto select more than one page at a time. To send the FAX pages, click onFile then Send To FAX or keep the CTRL key held down and drag thepages to the FAX icon on the Mustek Scanning Desktop. (NOTE: For this towork, your FAX software must allow FAXing of multiple files.) Mustek Scanning Desktop ForWindows 3.1xDue to limitations in the Windows 3.1x Operating System, manyof the features of the Windows 95 Mustek Scanning Desktop are not availablein the Windows 3.1x version. Clicking this iconwill allow you to scan an image into iPhoto Plus without having to startiPhoto Plus first. When you click the icon, you will be given a Quick Settingscreen where you can set certain parameters for the scan such as Scan Mode,Resolution and Paper Size. If you click the more Control button, the Twaindialog box will open. The Twain dialog box allows you to do two thingsthe Quick Setting screen does not allow. First it lets you Prescan andsecond, it lets you set the Crop Frame to a custom paper size. Clicking this iconwill scan a text document using TextBridge Classic OCR. The finished documentwill automatically be opened in the Windows 3.1x Notepad. The Quick Settingsscreen allows you to choose Paper Size and 300 dpi or 400 dpi. You shoulduse 300 dpi for most documents because the OCR engine is optimized for300 dpi scans. Use 400 dpi only if the original text is a very small font. |