 | Document # 4040 |
        |
Installation Tips for the SIIG Parallel Pro Enhanced Parallel Port |
Description: |
Customer has installed a SIIG Parallel Pro Enhanced Parallel Port andthe scanner still does not work. |
Cause: |
On most computers, the Mustek Plug-N-Scan series scanners will onlyoperate when attached to LPT1. |
Solutions: |
| Option 1: Leave the scanner on the original parallel port andput the printer on the new port |
If your Plug-N-Scan series scanner works fine on your original parallelport, it may be easier to configure your SIIG Parallel Pro as LPT2 andattach your printer to it while leaving the scanner on the original parallelport as LPT1. Refer to the instructions that came with the Parallel Proif you choose to make it LPT2. |
| Option 2: Attach the scanner to the SIIG Parallel Pro configuredas LPT1 and reconfigure the original port to LPT2 |
The Plug-N-Scan series scanners will perform best when attached to anEnhanced Parallel Port. If you have purchased a SIIG Parallel Pro EnhancedParallel Port for your scanner, you may need to configure it as LPT1 inorder for the scanner to work when attached to the Parallel Pro. If yourexisting parallel port is not an Enhanced Parallel Port, follow the stepsbelow to reconfigure your original port as LPT2 and install the SIIG ParallelPro as LPT1. |
| Disclaimer: Experience has shown that many Mustek Plug-N-Scanseries scanner owners purchase the SIIG Parallel Pro Enhanced ParallelPort from SIIG, Inc. The information in this document is provided solelyfor the convenience of Mustek customers. Mustek technicians are unableto help you configure your SIIG Parallel Pro over the telephone. If youhave trouble installing the SIIG Parallel Pro, contact SIIG’s TechnicalSupport Department for assistance. Publishing of this information is notto be construed as an endorsement of SIIG, Inc. or any of its’ productsby Mustek. The jumper configurations listed herein will optimize the SIIGParallel Pro for use solely with the Mustek Plug-N-Scan series scanners.This configuration may not be optimal when attaching other devices to theParallel Pro. |
| NOTE: Most non Plug-n-Play sound cards use IRQ 5. If your sound cardcannot be configured to use an IRQ other than 5 or 7, you will not be ableto add the SIIG Parallel Pro to your computer because Parallel ports canonly use IRQ 5 or 7. Many Plug-n-Play sound cards can use other IRQ settings.If your sound card is Plug-n-Play, you should be able to get the ParallelPro to function. |
Background: |
| The standard order of address assignments for each LPT port is: |
| LPT Port # | Port Address | ||
| LPT1 LPT2 LPT3 | 3BCh O378h 0278h | ||
| Unlike serial ports, which can be specifically set as COM1, COM2 COM3or COM4, LPT parallel ports are defined by the I/O port address. The highestaddress in the system is always LPT1; the second highest, LPT2; the third,LPT3. This is the prioritized order for I/O port addresses: 3BCh, 378hand 278h. |
| Example 1: When 1 parallel port with address 3BCh or 378h is alreadyinstalled… the parallel port on the Parallel Pro will be addressed asLPT2 when set to 278h. |
| Example 2: When 1 parallel port with address 278h is already installed…the parallel port on the Parallel Pro will be addressed as LPT1 when setto 378h. (Setting the address on the Parallel Pro to the same one usedby the existing parallel port will result in a conflict message duringboot.) |
| Therefore, to make the SIIG Parallel Pro LPT1 you must set its’ addressto 378h. Your existing parallel port is probably using 3BCh or 378h. Youmust change it to 278h. This is done through your Computer’s BIOS or CMOSSetup Utility. If you are unfamiliar with changing BIOS settings, referto your computer’s manual or contact the company who manufactured it. Mustektechnicians will not be able to assist you with this. |
| When you are in the BIOS, note what IRQ your original parallel portis using. It will either be IRQ5 or IRQ7. You must set the SIIG ParallelPro to whichever of these two is not being used by the original parallelport. |
Setting Jumpers on the SIIG Parallel Pro: |
| The LPT port address, IRQ, LPT mode and DMA settings are jumper selectablevia six 3-pin jumpers located on the board. |
| The following illustrates various jumper positions. Notice that a jumperis turned off by setting its’ shunt over one pin only. |
On 2 & 3 |
On 1 & 2 |
Off | |||||
| To remove a jumper, simply pull up on the selected jumper’s shunt.To install a jumper, center it over the appropriate pin or pins and pushdown gently until it is seated. |
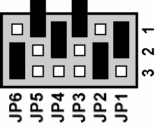
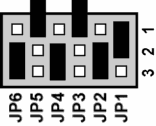
| To configure the SIIG Parallel Pro as LPT1, set the jumpers as indicatedin one of the diagrams below. The only difference between the diagramsis that one of them sets the SIIG card to IRQ5 and the other sets it toIRQ7. |
Use these settings for IRQ5 |
Use these settings for IRQ7 | ||||||
| LPT Port Address – JP6 |
The Parallel Pro is factory set as 278h. Reset it to 378h by placingthe jumper over pins 2 & 3 as indicated in the diagram above. |
| Interrupt Request – JP4 |
The Parallel Pro is factory set as IRQ5. If your existing parallel portuses IRQ5, reset jumper JP4 for the IRQ7 option. |
| LPT Mode – JP1 & JP2 |
The Parallel Pro is factory set for EPP/ECP mode. You will need to changeit to EPP mode by setting jumpers JP1 to pins 1 & 2 and JP2 to pins2 & 3. |
| ECP DMA Select – JP3 & JP5 |
The Parallel Pro is factory set for DMA 3. This affects fast data transferin ECP mode ONLY. It is recommended that you set JP3 and JP5 over pin 1only. This makes the SIIG Parallel Pro function without a DMA which itwill not need anyway since it is not being set to ECP mode. |
Installation and Configuration: |
After you have reconfigured your original LPT port’s BIOS setting’sand set the jumpers on the SIIG Parallel Pro, install it in your computer.If you have Windows 3.x, there is no further configuration necessary. Ifyou have Windows 95, you will need to configure the card in the DeviceManager. If Windows 95 did not detect the SIIG Parallel Pro, you will haveto run the Add New Hardware Wizard in the Control Panel. If Windows stilldoes not detect the new SIIG Parallel Pro card, you will have to use theAdd New Hardware Wizard to manually add the new parallel port. Read theWindows help to learn how to do this. |
Resource Allocation: |
After the new parallel port appears in the Device Manager, you mustcheck to see that its’ resources are correct. This will reserve the resourcesset by the card’s jumpers so future installation of Plug-n-Play devicesdon’t cause conflicts with the SIIG Parallel Pro. Proceed as follows: |
1. Click START and select Control Panel. |
2. Double click the System icon and click the Device Manager Tab. |
3.Click the + sign next to Ports then double click LPT1 (If you properlyset the jumper on the Parallel Pro to address 378h, it will be LPT1, thoughWindows will not list it as the SIIG Parallel Pro). |
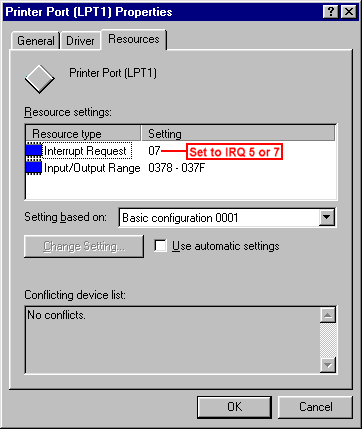
4. Click the Resources Tab of the Parallel Port Properties window. Referto the diagram below:
|
5. Uncheck the "Use automatic settings" box. |
6. From the list, choose Basic Configuration 1 (The default, Basic Configuration0, does not reserve the IRQ setting). |
7. Highlight the IRQ resource and click the Change Setting button. |
8. Change the IRQ to 5 or 7, whichever corresponds to the jumper settingyou assigned to the Parallel Pro (Observe the conflict listing box to ensurethe new setting does not conflict with other hardware). |
9. Save your changes and restart your computer. |
10. Your Plug-and-Scan series scanner should now work on the SIIG ParallelPro card that is now LPT1. |
Re-assigning Printer to LPT2: |
The port that your printer is on has now become LPT2. You must changethe printer’s port assignment in the Printer Folder before the printerwill function. Here are the procedures: |
1. Click START and select Settings then Printers. |
2. Using the right mouse button, click on your printer’s icon and selectProperties from the pop-up Menu. |
3. Click the Details Tab. |
4. Click the down arrow next to LPT1 and choose LPT2 from the drop downlist. |
5. Click OK to save the change. |
6. Your printer should print fine now on your original parallel portthat is now LPT2. |
| Mustek and the Mustek logo are trademarks and registered trademarksof Mustek, Incorporated. Any use without the express written permissionof Mustek is forbidden. Other company and product names may be trademarksor registered trademarks. |