VDC-300 Multi-function Digital Camera FAQ (Frequently Asked Questions) 1. Control of the camera or importing pictures from the camera are not options in the import dialog box. 2. Where can I get a CompactFlash memory card for my VDC-300? 3. The batteries need replacing often. 4. What kinds of batteries should be used with the camera? 5. The camera powers off immediately after powering on or taking a picture. 6. How does the camera connect to the computer? 7. My system doesn't have a free serial port, or my serial port connection doesn't match the camera's cable. Can I use an adapter? 8. No image is captured when the shutter button is pressed. 9. Captured images are too dark, have muted or streaked colors or are washed out. 10. Can the USB connection be used with Windows NT 4.0? 11. Can the VDC-300 be used with Windows 3.1x? 12. Why won't the PC camera video feature work with the serial port connection? 13. When using the VDC-300 as a video camera, there is no picture out to the TV or VCR.
1. Control of the camera or importing pictures from the camera are not options in the import dialog box. Cause: The options for controlling the camera or importing an image cannot be selected in the import dialog box. Solutions using the RS-232 serial port connection: - Make sure the camera is powered On and the RS-232 serial cable is connected to the serial port on the rear of the computer.
- The COM (communications) port may not be configured correctly. This is especially true for systems with a serial mouse and internal modem. COM ports 1 and 2 may be in use and the system may not have more COM ports available. Follow the steps below to verify the settings and then add more COM ports:
- Click on Start and choose Settings and then Control Panel.
- In the Control Panel, double-click on the Modem icon.
- Click the Diagnostics tab. This will show what devices are using the COM ports.
- Make note of which COM ports are loaded and the hardware attached to each port. Most systems have at least two COM ports, with ports 1 and 2 generally used by the serial mouse and internal modem.
- If the mouse is on Serial Port 1, COM1 and the modem is internal using COM2, then another COM port will need to be added in the computer's BIOS.
- The next few steps involve changing the computer's BIOS. It is important not to change anything in the BIOS other than what is recommended below. You may wish to consult with your computer manufacturer for assistance in configuring the BIOS.
- Reboot the computer system and watch for the prompt to enter the BIOS set-up utility. For help on entering the BIOS, click here.
- Once in the BIOS, cycle through the menu options until you find "ONBOARD SERIAL PORT 2." (You may have to contact your computer manufacturer to locate this as the location can vary from system to system.)
- Change the settings for "Onboard Serial Port 2" to COM4 with the address 02E8, IRQ 3.
- Save the changes and exit the BIOS set up utility.
- Once Windows finishes loading, verify the addition of the new COM port by clicking on Start, choosing Settings and then Control Panel.
- In Control Panel, double-click the System icon and choose the Device Manager tab.
- Click on the "+" next to the entry for Ports (COM & LPT).
- COM4 should now be listed with the other ports.
- Exit the Device Manager, launch the camera software and try to reconnect.
- Make sure that the RS-232 serial port is properly connected to the computer's motherboard.
Solutions using the USB connection: - The USB connection is designed for Windows 98 only. While Windows 95 release B (version 4.00.950B) has USB, the connection may not be reliable.
- Make sure the camera is powered On and that the USB cable is connected from the camera to the USB port on the rear of the computer.
- Verify that the USB controller is installed and working in the Windows Device Manager.
- Make certain the USB port is physically connected to the motherboard and enabled in the system BIOS, or that the USB card is operational.
2. Where can I get a CompactFlash memory card for my VDC-300? CompactFlash memory cards are sold at many computer retailers who carry computer memory accessories. They will vary in price depending on the store, brand and card capacity. The VDC-300 can use cards up to 32 MB. We have tested the following brands on our cameras: Kingston, Lexar, Sandisk, SimpleTech and Viking. For more information on CompactFlash cards, click here.
3. The batteries need replacing often. Cause: The batteries seem to go dead after a few uses of the camera, especially when the LCD screen or flash are used. Solution: Like most high-end electronic devices, the VDC-300 has several features that can severely drain batteries. Use the following steps to help lengthen battery life. - Use the supplied AC adapter whenever possible, especially when transferring images to the computer or during video playback.
- Use only fresh, high-drain alkaline or lithium batteries such as Duracell� Ultra, Energizer� Advanced Formula™ or Rayovac Maximum™. Rechargeable nickel-cadmium (NiCd) batteries are convenient, but they tend to drain faster than standard alkaline or lithium batteries.
- Try not to mix fresh and old batteries.
- Constant use of the LCD screen consumes a lot of power. When taking pictures, it is best to use the viewfinder instead of the LCD to line up and frame shots. Use the LCD just for reviewing pictures on Playback mode or selecting menu options.
- The camera is very light sensitive and the flash is only needed in very dark situations. Since the flash also consumes a lot of power, it is best to use it only when necessary. Set the flash to OFF in the menu. Setting the flash to AUTO still charges the flash, even if it is not used.
4. What kinds of batteries should be used with the camera? Since the VDC-300 is a high-end electronic device, it relies on a strong power source for best results. The best batteries to use are any kind of alkaline or lithium AA cells. Several manufacturers have lines of batteries specifically meant for high-end electronics such as Duracell� Ultra, Energizer� Advanced Formula™ and Rayovac Maximum™. Rechargeable nickel-cadmium (NiCd) batteries are very convenient, but they tend to drain quickly in high-end devices. Since they are rechargeable, another set can be kept charged and ready when one set goes down, but they may not provide as much continuous use as advanced alkaline or lithium batteries. Some functions, such as transferring images to the computer, playing images on a television or capturing real-time video work best with the supplied AC adapter.
5. The camera powers off immediately after powering on or taking a picture. Cause: The batteries are nearly dead or the camera’s "Auto-Off" option is set to YES. Solution: Replace the batteries with a fresh set of alkaline or lithium batteries. It is best not to mix old and new batteries together, so four fresh AA batteries should be used. To conserve battery life, the camera has an "Auto-Off" feature that is set to YES by default. This feature automatically shuts off the camera after 90 seconds if it has not been used. To set the camera to continuous power, follow these steps: - Turn the camera on with the power button.
- Turn the LCD screen on.
- Press the Menu key.
- Use the down arrow key to scroll through the options to the second set of options.
- On the LCD screen, the green arrow should now point to AUTO-OFF: YES.
- Press the Enter key to change the selection to AUTO-OFF: NO. A green "P" will appear in the lower center of the LCD screen.
Note: When the Auto-Off feature is set to NO, the LCD screen will still turn off after 10 minutes to conserve battery life. The Auto-Off feature defaults to YES when the camera is turned off.
6. How does the camera connect to the computer? The camera attaches to an RS-232 serial port or to a USB port. Most computers have one or two serial ports that can accommodate the camera connection and new systems with Windows 98 may have one or two USB ports. USB Connection: Simply connect the USB cable to the USB port on the rear of the computer as highlighted below. (This is for Windows 98 only.) 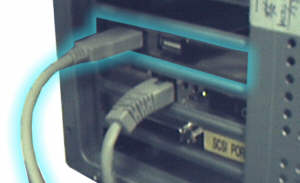
RS-232 Serial Port Connection: Click on the image that most closely resembles your computer's port configuration. | Some computers have a single serial port with a 9-pin connector. Usually these systems have a PS/2 connection for attaching the mouse. | 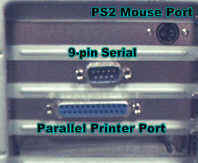 | | Many systems have two 9-pin serial connections. Sometimes one is used for the mouse, although some systems will still have a separate PS/2 connection for a mouse. | 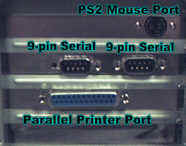 | | Another common configuration is a 9-pin serial connection alongside a 25-pin serial connection. Once again, the mouse may use one of these connections, or the system may include a PS/2 connection for the mouse. | 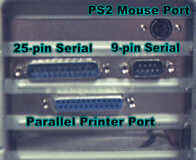 |
7. My system doesn’t have a free serial port, or my serial port connection doesn’t match the camera’s cable. Can I use an adapter? In some systems, there is only one serial port and it may be in use by the mouse. In these cases, the best options are: - If the system has a USB port and Windows 98, use this as an alternative.
- Connect a second serial port to the computer's motherboard. This will depend on whether or not another serial port connection is available on the system’s motherboard. It would be best to consult the computer’s manual or manufacturer for further help.
- If the system has a PS/2 mouse connection, it is possible to get an adapter from the 9-pin serial connection to the PS/2 connection. These can be found at most computer retailers.
 - If the system has a 9-pin serial port being used by the mouse alongside a 25-pin serial port, then the camera can be connected with a gender changer. Gender changers are available through most computer retailers. The changer needed to attach the camera would be a 9-pin male to 25-pin female. Once attached to the end of the camera serial cable, the cable can be attached to the second 25-pin serial port.

8. No image is captured when the shutter button is pressed. Cause: The shutter is pressed, but no image is captured. Solution: Check the following: - The camera is using fresh batteries, or the AC adapter.
- The mode is set to Camera (green LED indicator) and not Playback (red LED indicator).
- The camera’s memory may be full. Transfer or delete some images from the internal memory, or add a CompactFlash card for additional memory capacity. Click here for more information on CompactFlash cards.
9. Captured images are too dark, have muted or streaked colors or are washed out. Cause: The camera is set to an incorrect iris or white balance setting for the situation or the flash is being used too closely to a subject. Solution: The VDC-300 has a white balance feature designed to adjust the camera color sensitivity to the prevailing color of white outdoor light, yellow indoor light or greenish fluorescent lighting. To adjust the white balance, turn on the LCD screen and press the Menu key. Use the down key to move the green arrow next to the third option: W.B.: AUTO (the default setting). Press the Enter key to select a different white balance setting. The other settings are: - "Indoor -": This is for normal indoor lighting provided by standard bulbs that is prevalently yellowish.
- "Indoor +": This is for indoor lighting as found in businesses from fluorescent sources. It is a brighter, greenish light.
- "Outdoor": This is for the natural white light provided by the sun.
- "Auto": The default setting. The camera will automatically adjust to the strongest type of light. If the colors seem off, move the camera slightly to allow the light sensor to recalibrate.
The camera also has two iris options controlled by the switch on the front of the unit. The upper setting is iris setting F8.0 and reduces the amount of light in the image. This is best for close shots with plenty of light. The second iris option is the lower setting on the switch and is F2.8. This allows more light in the image and is best for long range shots, images with backlighting or low-light shots. | Bright flares of light or blurred color can be caused by too much direct light on a subject. Reduce the iris setting by moving the switch to the upper position (F8.0). | 
| 
| Picture taken towards sun with iris at F2.8 (lower position). | Picture taken towards sun with iris at F8.0 (upper position). | | Colored streaks and dots can result when there is not enough light on the subject, try opening the iris to the lower setting (F2.8). | | 
| Picture taken indoors with iris at F8.0 (upper position). | Picture taken indoors with iris at F2.8 (lower position). | | The flash is very bright, and using it on close-up objects with the iris set to the F2.8 or lower position may cause images to become washed out. Turn off the flash or close the iris setting to F8.0 (upper position). | | 
| Picture taken indoors with flash on, but close to subject. | Picture taken indoors with flash off, close to subject and iris at F2.8 (lower position). |
10. Can the USB connection be used with Windows NT 4.0? No, the RS-232 serial port connection will need to be used for NT 4.0.
11. Can the VDC-300 be used with Windows 3.1x? No, the VDC-300 is only compatible with Windows 95, 98 and NT 4.0.
12. Why won't the PC camera video feature work with the serial port connection? The RS-232 serial port connection is too slow for reliable video and the USB must be used.
13. When using the VDC-300 as a video camera, there is no picture out to the TV or VCR. The VDC-300 is sold in many locations, and it has the ability to interact with the two most common television systems: PAL and NTSC. PAL (Phase Alternating Lines) is the standard used in Europe while NTSC (National Television Standards Committee) is used in North America. The VDC-300 defaults to the PAL system. If no image is being sent to VCR or TV, and the camera is definitely turned on and correctly connected, use the following steps to change the video output to NTSC: - Turn on the camera and the LCD screen.
- Press the Menu key and use the down arrow to scroll down through the first set of options.
- On the second set of options, move the green arrow in front of TV. It should read TV: PAL.
- Press the Enter key show that it changes to TV: NTSC.
- The camera should now be able to send images to the TV or VCR.
|